DevBox reference
DevBox is currently undergoing an update and is not available for download. A new version will be available in the near future. Please check back for updates.
System requirements
To use the Magento DevBox, you must have a system with the following:
- 64-bit Windows 10 Pro, Enterprise and Education (1511 November update, Build 10586 or later)
- Mac OS 10.10.3 “Yosemite” or later
Magento DevBox is packaged with the following:
- Debian GNU/Linux 8 (jessie)
- Apache 2.4.10
- PHP 7.0.12
- MySQL 5.6.34
Prerequisites
This section discusses prerequisites you must complete before you install the Magento DevBox.
Docker prerequisites
Before you continue, make sure you install and configure the following:
- Mac OS and Windows: Install the Docker software
-
Windows 10 only:
-
You must enable Hyper-V
After Docker starts, it requests you to enable Hyper-V. A reboot is required.
-
Set up Docker file sharing as discussed in the next section
You cannot work with Docker, VirtualBox, or Vagrant simultaneously on Windows 10.
-
Set up Docker file sharing
For the Magento application to work, the application must be installed in a folder that Docker uses for file sharing.
Windows
To set up Docker file sharing on Windows:
- Right-click the Docker icon in the system tray.
- From the pop-up menu, click Settings.
-
Click the Shared Drives tab.
This tab page displays all drives that Docker currently knows about. Make sure you install Magento in a drive listed on this tab page.
- Select the check box next to the drive in which to install Magento.
- Click Apply.
Mac OS
To set up Docker file sharing on the Mac OS:
- Right-click the Docker logo.
- From the pop-up menu, click Preferences.
-
In the Preferences dialog box, click the File Sharing tab.
This tab page displays all shared directories that Docker currently knows about. Make sure you install Magento in a folder listed on this tab page.
- To add additional directories, follow the prompts on your screen or consult Docker documentation.
Get Magento DevBox now
To get Magento DevBox now, go to the Magento download page.
- Magento DevBox should be used in development only. (You should not use it in production.)
- Magento DevBox is Beta software. Report any issues on the DevBox GitHub repository.
How DevBox uses file sharing
DevBox runs in a Docker container, which is also referred to as the guest operating system. The Magento files and folders are located on your host operating system (Windows or Mac OS). To facilitate development, Magento files and directories are shared by the guest and host operating systems.
When you make a change to files, the changes are automatically synchronized, regardless of which files you change. (In other words, if you change files on the host operating system, those files are synchronized with the guest operating system and vice versa.)
Use the following guidelines:
-
New Magento DevBox installations: Files are shared in the
shared/webrootfolder relative to your Magento installation root folder.The Magento installation root folder is typically a subfolder of the folder in which you extracted the
.zipfile you download from Magento. -
If you use an existing Magento installation with DevBox: Files are shared in the location to which you downloaded Magento.
Magento authentication prerequisites
The repo.magento.com repository is where Magento 2 and third-party Composer packages are stored and requires authentication. Use your Magento Marketplace account to generate a pair of 32-character authentication keys to access the repository.
To create authentication keys:
- Log in to the Magento Marketplace. If you don’t have an account, click Register.
-
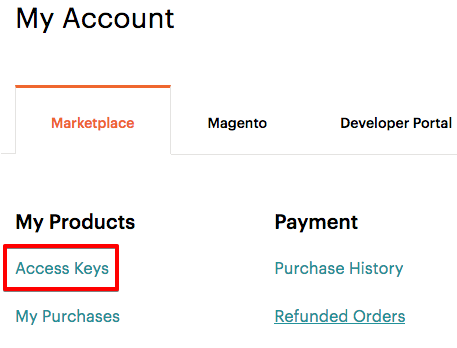
Click your account name in the top-right of the page and select My Profile.
-
Click Access Keys in the Marketplace tab.
-
Click Create a New Access Key. Enter a specific name for the keys (e.g., the name of the developer receiving the keys) and click OK.
- New public and private keys are now associated with your account that you can click to copy. Save this information or keep the page open when working with your Magento project. Use the Public key as your user name and the Private key as your password.
Manage your authentication keys
You can also disable or delete authentication keys. For example, you can disable or delete keys for security reasons after someone leaves your organization.
- To disable keys: Click Disable. You can do this if you want to suspend use of your keys.
- To enable a previously disabled key: Click Enable.
- To delete keys: Click Delete.
You cannot delete or disable keys you created by signing in to your magento.com account. To manage those keys:
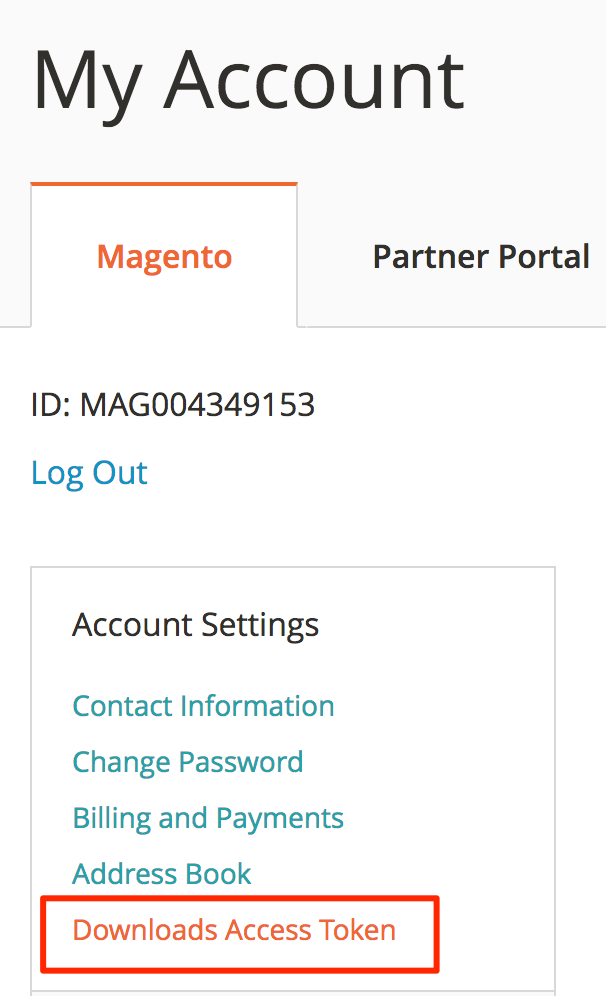
- Log in to your magento.com account.
- Click My Account at the top of the page.
-
Click Account Settings > Downloads Access Token.
- Click Generate new token to replace and disable an existing token.
How to download Magento code
This section applies to you if you use an existing Magento installation with DevBox. This means you first download the Magento software using either Composer or a compressed archive but you don’t install the software.
Downloading a compressed archive has potential issues on the Mac OS, which extracts known compressed file types like .zip to a folder. The folder contains files that have to be copied in a particular way; otherwise, the Magento DevBox doesn’t perform properly.
If you download a compressed archive on the Mac OS, you must make sure to copy all of the Magento code to an empty folder. In particular, you must copy all Apache distributed configuration files, named .htaccess, to the folder. .htaccess files are located in several Magento directories, including in the root folder.
Failure to copy .htaccess files causes the Magento application to function incorrectly because URL redirects won’t work.
When you download a file on the Mac OS, the file is usually located in the /Users/<name>/Downloads folder. If you download a .zip file, it’s usually extracted to a subfolder like the following:
/Users/<name>/Downloads/<Magento folder name>
To make sure your existing Magento installation works it with DevBox, create an empty folder and copy all of the contents of the Magento compressed file to it as follows:
mkdir -p <path>
cp -r /Users/<name>/Downloads/<Magento folder name> <path>
Don’t use arguments like /* in the cp command because hidden files like .htaccess won’t copy.
For example, to copy Magento Open Source 2.1.3 code to a new folder named /Users/me/Applications/Magento, use the following commands:
mkdir -p /Users/me/Applications/Magento
cp -r /Users/me/Downloads/Magento-CE-2_1_3_zip-2016-12-16-06-04-03 /Users/me/Applications/Magento
Double-check to make sure the hidden files were copied:
ls -al /Users/me/Applications/Magento
The first files listed should be:
.gitignore
.htaccess
.htaccess.sample
.php_cs
.travis.yml
 .user.ini
All the files in the preceding list are hidden; if these files exist in the folder, it confirms you copied them correctly.
Installation options
This section discusses options common to creating a new Magento installation or using an existing Magento installation.
New or existing installation
The first question the wizard asks is whether you want to:
-
Create New Magento Installation
Choose this option if you haven’t yet downloaded the Magento software.
-
Get Only DevBox and Use Existing Local Installation
Choose this option if you have already downloaded the Magento software but haven’t installed it yet.
Choose your operating system
Click a supported operating system.
Local Project Path (existing installation only)
Enter the path to install the Magento application. The simplest option is to specify an absolute file system path like /Users/me/magento. The folder must already exist.
See How to download Magento code.
Select Magento Edition
For new installations, you have the option to install Magento Open Source or Magento Commerce. Both editions require authentication; to get Magento Commerce authentication credentials, you must be a licensed customer.
Optional sample data Optional sample data provides a storefront based on the Luma theme outfitted with products, categories, customer registration, and so on. It functions just like a Magento storefront and you can manipulate prices, inventory, and promotional pricing rules using the Magento Admin.
Select the check box to install optional sample data. This option increases your installation time by a few minutes.
Access Keys
Enter your Magento public and private authentication keys in the provided fields.
Click Take Me to My Access Keys to log in to magento.com and get or generate authentication keys.
Advanced options for new installations
To provide you more control over your Magento installation, we enable you to choose the following advanced options:
| Option | Description |
|---|---|
| Local Project Path | Enter the path to install the Magento application. The simplest option is to specify an absolute file system path like |
| Store Admin Username | Enter a user name for the Magento Admin, the management application for your stores. |
| Store Admin Password | Enter the administrator's password. |
| Authentication Key Directory | Directory used to store your Magento authentication keys. From the Composer Directory list, click either of the following:
|
| Environment configuration | Choose which of the following software to install:
|
Advanced options for existing installations
| Option | Description |
|---|---|
| Store Admin Username | Enter a user name for the Magento Admin, the management application for your stores. |
| Store Admin Password | Enter the administrator password to log in to the Magento Admin, the management application for your stores. |
| Authentication Key Directory | Directory used to store your Magento authentication keys. From the Composer Directory list, click either of the following:
|
| Environment configuration | Choose which of the following software to install:
|
Run scripts
After you finish the DevBox wizard, you’re prompted to download a .zip file to any folder on your system. When you extract the .zip file, your operating system might create another folder.
In the following example, the user downloaded build-18c4e4d3c5a541f37e9cffd35f1bf74e.zip to a C:\magento folder on Windows. Extracting the .zip created a subfolder.
C:\magento\build-18c4e4d3c5a541f37e9cffd35f1bf74e\build-18c4e4d3c5a541f37e9cffd35f1bf74e
An equivalent folder on Mac OS follows:
/Users/me/Downloads/build-18c4e4d3c5a541f37e9cffd35f1bf74e
The preceding sample paths are referred to as the DevBox root folder.
To run the scripts, you should open a DOS command prompt (Windows) or Terminal (Mac) window and change to the DevBox root folder.
The following DevBox scripts and configuration files are located in the root folder:
m2devbox-init.[bat|sh]which starts the DevBox installation.-
m2devbox-reset.[bat|sh]which restarts the DevBox installation.You can run this script, for example, after you stop and start your computer or Docker. DevBox assigns new ports to services. You can do the following:
- To set static listen ports that don’t change every time you restart a container, see Set static listen ports before you run
m2devbox-init.[bat|sh] - To find the listen ports currently being used, see Stop, start, restart, and view port mappings.
- To set static listen ports that don’t change every time you restart a container, see Set static listen ports before you run
-
docker-compose.ymlDevBox configuration file.To set static listen ports so you don’t have to reconfigure PhpStorm every time you start DevBox, see Set static ports.
- Windows only:
m2devbox-unison-sync.bat, which runs Unison file synchronization. You should not run this script by itself; one of the other scripts starts it automatically. - Mac OS only:
m2devbox-debug.sh, which opens an SSH tunnel to the Docker container so PhpStorm can connect to it.
When you run the installation script on Windows, an additional command window opens for Unison sync. You don’t normally need to interact with this command window.
Do not close the Unison sync window; otherwise, files you change won’t be added to the Magento docroot.
Set static listen ports
By default, every time you start a Docker container, all listen ports are reassigned randomly. To cause DevBox to use the same listen ports every time you restart, you must modify docker-compose.yml before you initialize DevBox for the first time.
To set static listen ports:
-
Open
docker-compose.ymlin a text editor.It’s located in the root directory to which you downloaded DevBox.
- Locate the
ports:section. -
Precede the default listen port with a free port number followed by
:An example follows.
ports:
   - "12345:80"
   - "54321:22"
The preceding example causes the web container to listen on port 12345 and SSH to listen on port 54321.
Make sure the ports you assign to DevBox are not used by another process.
- Save your changes to
docker-compose.ymland exit the text editor.