Block
In functional tests we use Page Object Design Pattern. Under this pattern, a block is an area of the UI that a test interacts with, and a page is a container for blocks.
The Page Object Design Pattern is used to avoid unnecessary duplication of code and to make tests easier to support.
Block as a class represents a set of methods to manipulate with Magento UI blocks. It contains all logic you want to apply to the Magento block under test.
A block can have the following features:
- A block can contain other blocks.
- A block can be used in several pages and blocks.
This topic shows how to create a new block and explore its structure. It discusses how to use mapping for forms in blocks and forms in tabs.
Example
A block Magento\Ui\Test\Block\Messages extends a basic block Magento\Mtf\Block\Block and implements methods to interact with messages.
/**
 * Copyright © 2013-2017 Magento, Inc. All rights reserved.
 * See COPYING.txt for license details.
 */

namespace Magento\Ui\Test\Block;

use Magento\Mtf\Block\Block;
use Magento\Mtf\Client\Locator;

/**
 * Global messages block.
 */
class Messages extends Block
{
    /**
     * Success message selector.
     *
     * @var string
     */
    protected $successMessage = '[data-ui-id$=message-success]';

    /**
     * Last success message selector.
     *
     * @var string
     */
    protected $lastSuccessMessage = '[data-ui-id$=message-success]:last-child';

    /**
     * Error message selector.
     *
     * @var string
     */
    protected $errorMessage = '[data-ui-id$=message-error]';

    /**
     * Notice message selector.
     *
     * @var string
     */
    protected $noticeMessage = '[data-ui-id$=message-notice]';

    /**
     * Warning message selector.
     *
     * @var string
     */
    protected $warningMessage = '[data-ui-id$=message-warning]';

    /**
     * Wait for success message.
     *
     * @return bool
     */
    public function waitSuccessMessage()
    {
        return $this->waitForElementVisible($this->successMessage, Locator::SELECTOR_CSS);
    }

    /**
     * Get all success messages which are present on the page.
     *
     * @return array
     */
    public function getSuccessMessages()
    {
        $this->waitForElementVisible($this->successMessage);
        $elements = $this->_rootElement->getElements($this->successMessage);

        $messages = [];
        foreach ($elements as $element) {
            $messages[] = $element->getText();
        }

        return $messages;
    }

    /**
     * Get all notice messages which are present on the page.
     *
     * @return array
     */
    public function getNoticeMessages()
    {
        $this->waitForElementVisible($this->noticeMessage);
        $elements = $this->_rootElement->getElements($this->noticeMessage);

        $messages = [];
        foreach ($elements as $element) {
            $messages[] = $element->getText();
        }

        return $messages;
    }

    /**
     * Get last success message which is present on the page.
     *
     * @return string
     */
    public function getSuccessMessage()
    {
        $this->waitForElementVisible($this->successMessage);

        return $this->_rootElement->find($this->lastSuccessMessage)->getText();
    }

    /**
     * Wait for element is visible in the page.
     *
     * @param string $selector
     * @param string $strategy
     * @return bool|null
     */
    public function waitForElementVisible($selector, $strategy = Locator::SELECTOR_CSS)
    {
        $browser = $this->browser;
        return $browser->waitUntil(
            function () use ($browser, $selector, $strategy) {
                $message = $browser->find($selector, $strategy);
                return $message->isVisible() ? true : null;
            }
        );
    }

    /**
     * Get all error message which is present on the page.
     *
     * @return string
     */
    public function getErrorMessage()
    {
        return $this->_rootElement
            ->find($this->errorMessage, Locator::SELECTOR_CSS)
            ->getText();
    }

    /**
     * Get notice message which is present on the page.
     *
     * @return string
     */
    public function getNoticeMessage()
    {
        $this->waitForElementVisible($this->noticeMessage);
        return $this->_rootElement->find($this->noticeMessage)->getText();
    }

    /**
     * Get warning message which is present on the page.
     *
     * @return string
     */
    public function getWarningMessage()
    {
        $this->waitForElementVisible($this->warningMessage);
        return $this->_rootElement->find($this->warningMessage)->getText();
    }
}
Basic blocks
Magento contains basic blocks for the functional testing with a logic that you can reuse. The most popular are the following:
Magento\Mtf\Block\BlockMagento\Mtf\Block\FormMagento\Backend\Test\Block\Widget\TabMagento\Backend\Test\Block\Widget\FormTabsMagento\Backend\Test\Block\Widget\GridMagento\Ui\Test\Block\Adminhtml\DataGrid
Block identifier
Each block has an identifier that includes selector and searching strategy. This identifier is determined by the Magento\Mtf\Client\Element\Locator class and is stored in the _rootElement property of the Magento\Mtf\Block\Block class.
You can use the _rootElement to find an element in the current block.
Example from the WidgetInstance.php block:
<?php
protected function addLayoutUpdates()
{
   $this->_rootElement->find($this->addLayoutUpdates)->click();
}
This code uses _rootElement to search the button element by the $this->addLayoutUpdates selector. The advantage of the _rootElement is that it enables search in the context of the block to which the element belongs.
Form mapping
Often, you need to test a Magento block that contains a form. And of course, tests require entering data in the forms. The Functional Testing Framework (FTF) has a Magento\Mtf\Block\Form class that enables you to fill the forms automatically. One of the advantages of using this class is that you can list elements that must be automatically filled. These elements can be grouped in separate XML files. In the FTF we call this process “a mapping”. You can use mapping to transfer data to the block from the fixture.
A mapping file is an XML file which has the same name and path as the block does, and contains fields that represent form fields. Field name in the mapping file shall match the one in the fixture.
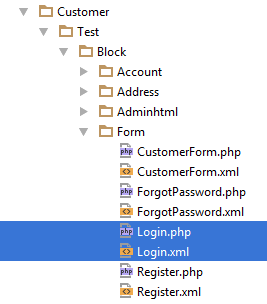
Let’s see the Customer Login block. The block has two input fields: email and password.

The mapping file for the block is stored in <magento2_root_dir>/dev/tests/functional/tests/app/Magento/Customer/Test/Block/Form/Login.xml, along with the block.
The mapping file defines the fields from the form.
<?xml version="1.0" ?>
<!--
/**
 * Copyright © 2015 Magento. All rights reserved.
 * See COPYING.txt for license details.
 */
-->
<mapping strict="1">
    <wrapper>login</wrapper>
    <fields>
        <email>
            <selector>[name='login[username]']</selector>
        </email>
        <password />
    </fields>
</mapping>
See a description of the nodes in the following table.
| Node | Description | Value from example |
|---|---|---|
mapping | Root node with a strict attribute. If strict equals 0, then all the fixture field data must be entered in the block form. If strict equals 1, then only the mapping file fields data must be entered in the block form. | "1". Only the mapping file fields data must be entered in the block form. |
wrapper | Automatically adds group_name to the selector of the field, when selector has not been specified. | login |
fields | The node containing mapping fields. | <email>, <password />. |
selector | Value for the selector that is used to find the field. Default: [name='group_name[field_node_name]']. Default value is assigned automatically if the node is absent in the field. | For the <email>, the [name='login[username]'].For the <password />, the [name='login[password]'] that is the default value where wrapper="login". |
strategy | The strategy of the selection. Available values: css selector, xpath. Default: css selector. | css selector as a default value. |
input | Type of the input element. Available values:
simple is for simple input element. Default: simple. Do not use class node, if you use input in the field. | simple as a default value. |
class | Class of the element. Applicable if non of the input options fits. Do not use input, if you use class in the field. | This node has not been used in the example. |
All nodes are optional. Default value is assigned automatically if a node (selector, strategy, input) is absent in the field.
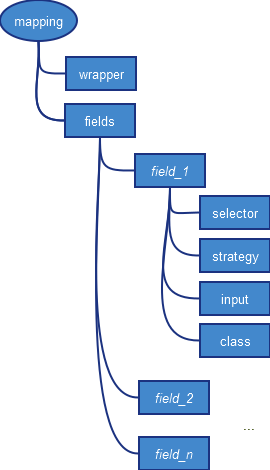
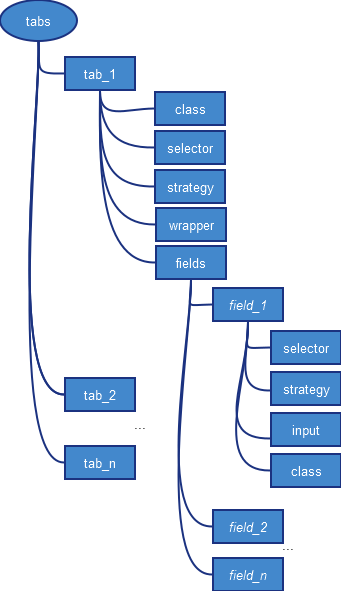
The general structure of the form mapping file:
Form tab mapping
You can use mapping for the forms on tabs (a form tab) that enables you to automate switching between tabs and entering the data.
To get the block class with form tab mapping, extend your class from Magento\Backend\Test\Block\Widget\FormTabs . If you want to use custom tab logic you can extend your class from Magento\Backend\Test\Block\Widget\Tab class.
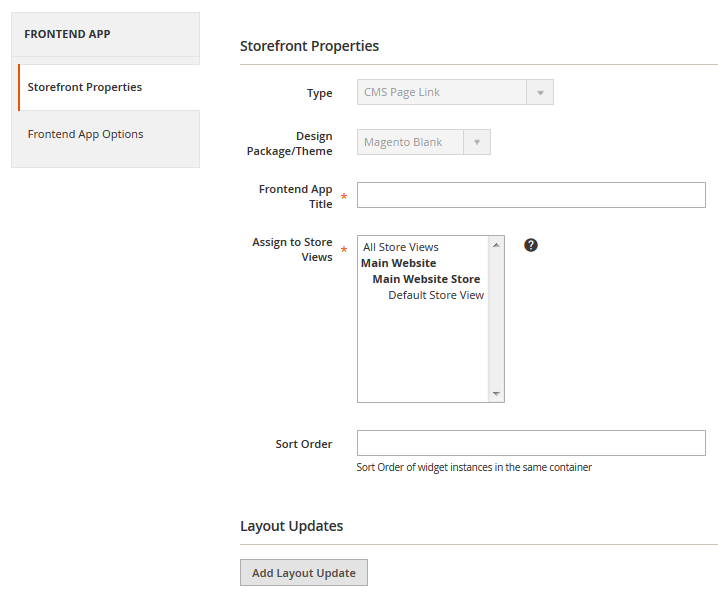
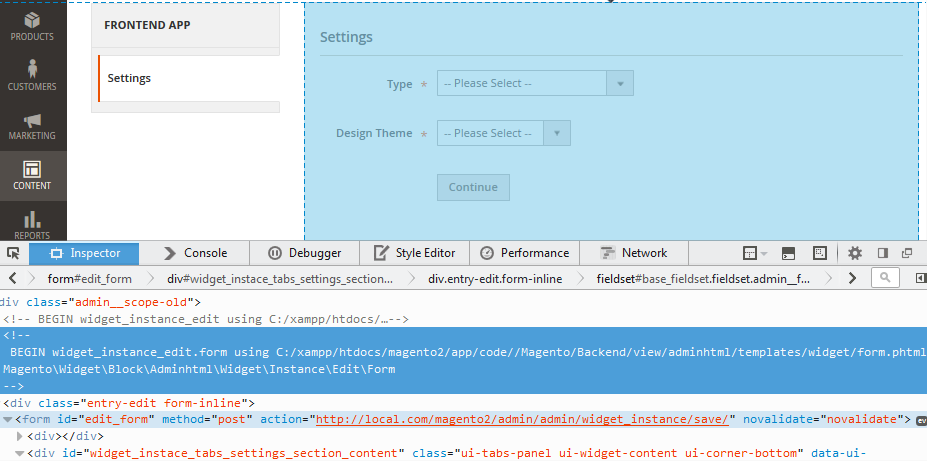
For example, let’s see tabs for the Magento Widget: Settings, Storefront properties, Frontend App Options, Layout Updates .
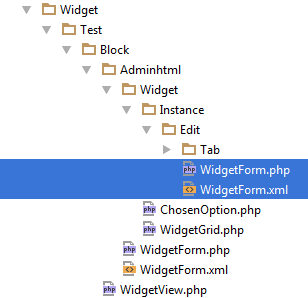
Four tabs are mapped in the <magento2_root_dir>/dev/tests/functional/tests/app/Magento/Widget/Test/Block/Adminhtml/Widget/Instance/Edit/WidgetForm.xml file, which is stored along with the block class.
The file contains the following mapping:
<?xml version="1.0" ?>
<!--
/**
 * Copyright © 2015 Magento. All rights reserved.
 * See COPYING.txt for license details.
 */
-->
<tabs>
    <settings>
        <class>\Magento\Widget\Test\Block\Adminhtml\Widget\Instance\Edit\Tab\Settings</class>
        <selector>#widget_instace_tabs_settings_section</selector>
        <strategy>css selector</strategy>
        <fields>
            <code>
                <input>select</input>
            </code>
            <theme_id>
                <input>select</input>
            </theme_id>
        </fields>
    </settings>
    <frontend_properties>
        <class>\Magento\Backend\Test\Block\Widget\Tab</class>
        <selector>#widget_instace_tabs_main_section</selector>
        <strategy>css selector</strategy>
        <fields>
            <title />
            <store_ids>
                <input>multiselectgrouplist</input>
                <selector>[id="store_ids"]</selector>
            </store_ids>
        </fields>
    </frontend_properties>
    <widget_options>
        <class>\Magento\Widget\Test\Block\Adminhtml\Widget\Instance\Edit\Tab\Parameters</class>
        <selector>#widget_instace_tabs_properties_section</selector>
        <strategy>css selector</strategy>
    </widget_options>
    <widget_instance>
        <class>\Magento\Widget\Test\Block\Adminhtml\Widget\Instance\Edit\Tab\WidgetInstance</class>
        <selector>#widget_instace_tabs_main_section</selector>
        <strategy>css selector</strategy>
    </widget_instance>
</tabs>
See the following table to understand the node’s purpose.
tabs nodes | Description |
|---|---|
wrapper | Automatically adds group_name to the selector of the field, when selector has not been specified. |
class | Reference to the class that handles tab’s behavior. |
selector | Identifier for the selector of the tab in the HTML code, used to open the tab. |
strategy | Strategy of the selector. Can be css selector or xpath. |
fields | List of fields with parameters, that are the same as in the form mapping. Also field in tab can include more then one field, in this case add field attribute composite="1". |
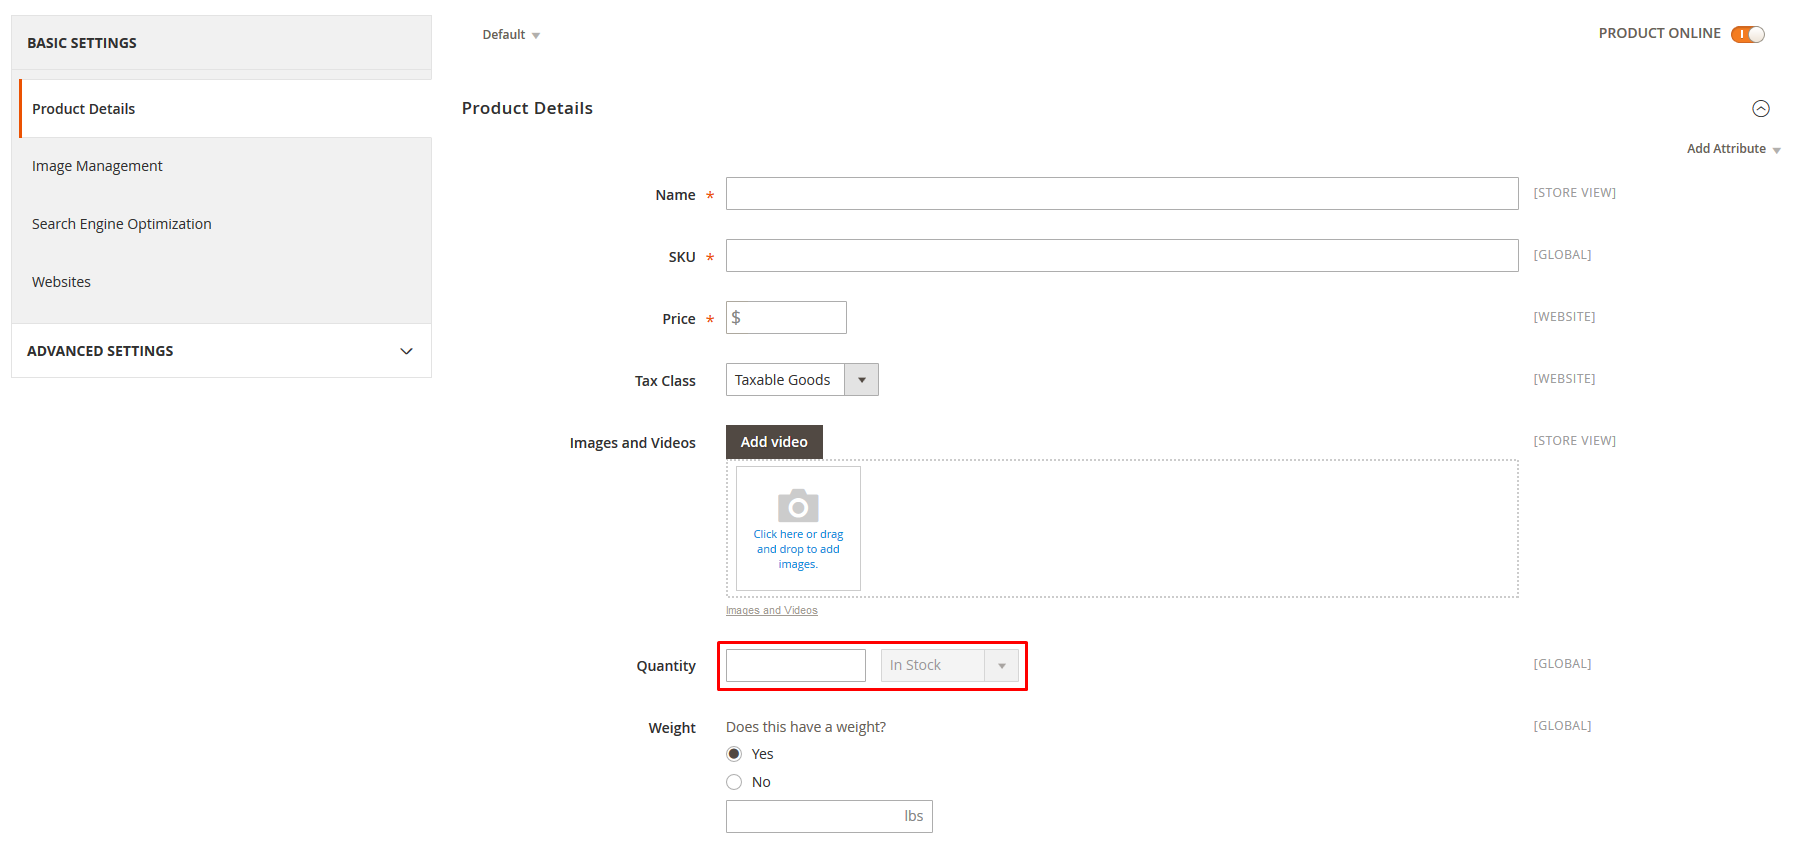
Example of composite field from ProductForm.xml:
In the mapping file:
<quantity_and_stock_status composite="1">
    <qty>
        <selector>[name="product[quantity_and_stock_status][qty]"]</selector>
    </qty>
    <is_in_stock>
        <selector>[name="product[quantity_and_stock_status][is_in_stock]"]</selector>
        <input>select</input>
    </is_in_stock>
</quantity_and_stock_status>
On the UI:
The general structure of the form tab mapping file:
Merging form tab mapping files
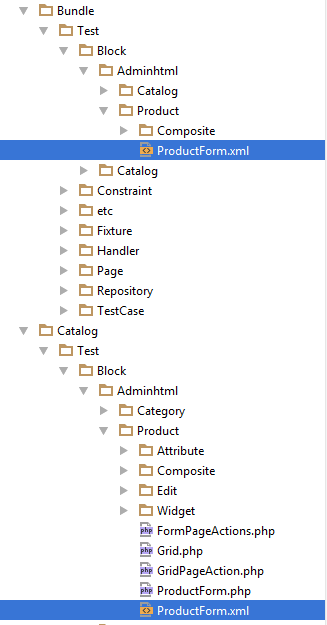
When you test a module that extends the functionality of the other module by adding a tab to the testing module entity, you can merge their form tab mapping files.
The form tab mapping files that have the same name and path inside different modules are merged automatically.
Form tab mapping files in the following example will be merged automatically:
Renders
Renders help to unify a polymorphic behavior of the block. If you want to test the functionality of the object, which behavior differs depending on the type of the object, you can create a separate class for each type and call the corresponding class using render.
HowTos
Create a block
A basic flow is the following:
- Get name and path of the block you want to test
- Create block class with logic you need for the tests
- Add block to the page
- Run the page generator
How to determine a block name and a path
The block name and path in the Magento functional tests (<magento2_root_dir>/dev/tests/functional/tests/app) should reflect a corresponding block in the Magento code base for your convenience.
For example, you develop a functional test for the bundle product creation, that uses the Bundle Items section. In the Magento code base, the block, which is responsible for the bundle option, is the .../Magento/Bundle/Block/Adminhtml/Catalog/Product/Edit/Tab/Bundle/Option.php, so in the Magento functional tests you can create a new file .../Magento/Bundle/Block/Test/Adminhtml/Catalog/Product/Edit/Tab/Bundle/Option.php.
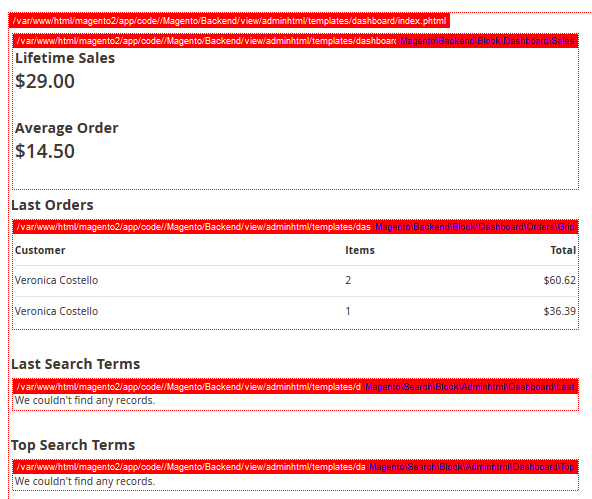
Magento can show you a full class name of the block and path to the PHTML template on the Magento page (changes web page design) or implicitly in the HTML code of the page.
Get the name and the path of blocks in UI
To enable this feature follow:
- Log in to Magento Admin as administrator
- Follow STORES > Configuration
- Change Store View to Main Website (the template path and block name will only appear for current website)
- Follow ADVANCED > Developer
- Expand the Debug tab
- Set Template Path Hints to Yes
- Set Add Block Name to Hints to Yes
- Save Config
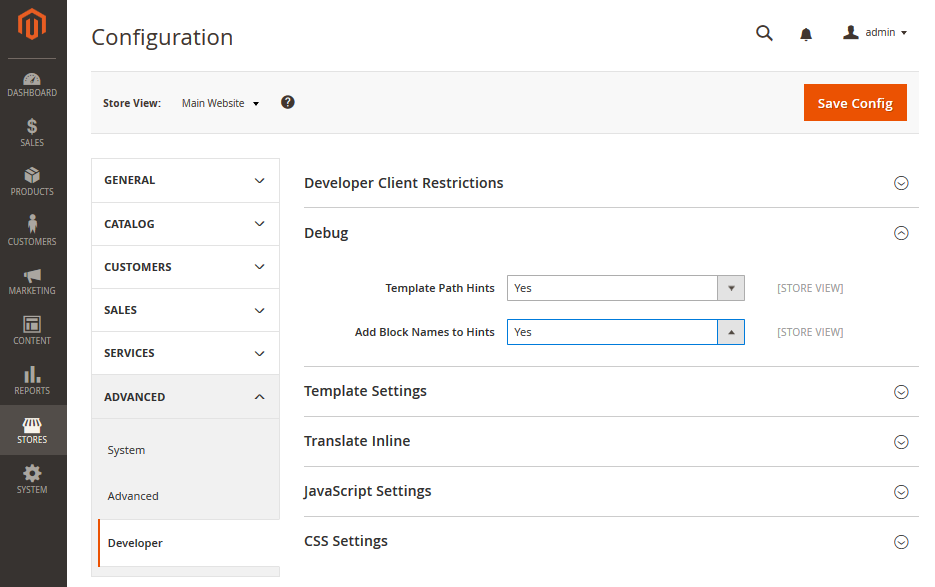
Now each UI block has hint about its name and path. Also, you can see the path to a PHTML template, where you can find a path to the Magento block, if you cannot find it in the hint.
If the name and path cover partially each other, hover the mouse pointer over the name or the path (whatever you need) with mouse pointer to see the full phrase.
Get the name and the path of blocks in the code
If you want to change the representation of block details, you can change a Template.php:
-
Open
<magento2_root_dir>/lib/internal/Magento/Framework/View/Element/Template.php -
Find the method
<?php
protected function _toHtml()
{
    if (!$this->getTemplate()) {
        return '';
    }
    return $this->fetchView($this->getTemplateFile());
}- Change the code to the following
<?php
protected function _toHtml()
{
    if (!$this->getTemplate()) {
        return '';
    }
    $name = $this->getNameInLayout();
    $template = $this->getTemplateFile();
    $class = get_class($this);
    return "<!-- BEGIN $name using $template \n" . $class . "-->"
        . $this->fetchView($template)
        . "<!-- END $name using $template -->";
}- Save the file
Now you can inspect any element in a browser, and find which block contains it.
Add a block to the page
Blocks are tested as part of the page object. To add the block to the page you must add a corresponding node to the XML file of the page object.
For example, the WidgetGrid.php is a part of the page that is defined in WidgetInstanceIndex.xml.
block is the node that adds the block to the page:
<config xmlns:xsi="http://www.w3.org/2001/XMLSchema-instance" xsi:noNamespaceSchemaLocation="../../../../../../../vendor/magento/mtf/etc/pages.xsd">
    <page name="WidgetInstanceIndex" area="Adminhtml" mca="admin/widget_instance/index" module="Magento_Widget">
        ...
        <block name="widgetGrid" class="Magento\Widget\Test\Block\Adminhtml\Widget\WidgetGrid" locator="#widgetInstanceGrid" strategy="css selector" />
        ...
    </page>
</config>
See the block node attributes details in the following table:
block attribute |
Description | Is required | Values | Example |
|---|---|---|---|---|
name |
Name of the block | Required | Unique in the page. The method to get the block class instance is generated using this value. | widgetGrid |
class |
Full name of the block class | Required | Class name | Magento\Widget\Test\Block\Adminhtml\Widget\WidgetGrid |
locator |
CSS selector or XPath locator of the block | Required | CSS Selectors, XPath | CSS: #widgetInstanceGrid, XPath: //*[@id="widgetInstanceGrid"] |
strategy |
Selector strategy | Required | css selector or xpath |
css selector |
Run the page generator
To apply all changes you've made to the page (XML file), run the class generator.
php <magento2>/dev/tests/functional/utils/generate.phpThe page will be updated in the <magento2>/dev/tests/functional/generated directory.
Use blocks inside blocks
You can get other blocks in the block using the BlockFactory class and a selector.
See the following example:
<?php
protected function getTemplateBlock()
{
    return $this->blockFactory->create(
        'Magento\Backend\Test\Block\Template',
        ['element' => $this->_rootElement->find($this->templateBlock, Locator::SELECTOR_XPATH)]
    );
}
In this code we are creating the Magento\Backend\Test\Block\Template block with the selector $this->templateBlock.
Create and use renders
Use case: We want to test the “Add to cart” functionality. To add different types of products, we need to configure each type in a different way. For the configuration, we need options of the type we want to configure. We can use render to get product options. Render specifies which class to use for the specific type of product.
Let’s see the Catalog/Test/Page/Product/CatalogProductView.xml page. For the better readability we reduced a list of blocks to one block.
<?xml version="1.0" encoding="utf-8"?>
<!--
/**
 * Copyright © 2015 Magento. All rights reserved.
 * See COPYING.txt for license details.
 */
 -->
<config xmlns:xsi="http://www.w3.org/2001/XMLSchema-instance" xsi:noNamespaceSchemaLocation="../../../../../../../vendor/magento/mtf/etc/pages.xsd">
    <page name="CatalogProductView" area="Product" mca="catalog/product/view" module="Magento_Catalog">
        <block name="viewBlock" class="Magento\Catalog\Test\Block\Product\View" locator="#maincontent" strategy="css selector" module="Magento_Catalog"/>
    </page>
</config>
This page relates to the Magento_Catalog module and contains ViewBlock. This block has reference to the Magento\Catalog\Test\Block\Product\View class, that is responsible to enter data in Product form fields. But different types of products, such as bundle, each have their own ViewBlock in a corresponding module. And that is where you can use render!
Create a render
Let’s create render for the bundle product.
Step 1. Create Bundle/Test/Page/Product/CatalogProductView.xml page to merge with the basic page Catalog/Test/Page/Product/CatalogProductView.xml. Learn more about page merging.
Step 2. In the Bundle/Test/Page/Product/CatalogProductView.xml, copy page node from the Catalog/Test/Page/Product/CatalogProductView.xml without module attribute
<?xml version="1.0" encoding="utf-8"?>
<!--
/**
 * Copyright © 2015 Magento. All rights reserved.
 * See COPYING.txt for license details.
 */
 -->
<config xmlns:xsi="http://www.w3.org/2001/XMLSchema-instance" xsi:noNamespaceSchemaLocation="../../../../../../../vendor/magento/mtf/etc/pages.xsd">
    <page name="CatalogProductView" area="Product" mca="catalog/product/view">

    </page>
</config>
Step 3. Insert block with the same name of block and add a render that indicates the type of product and the class that processes this block
<?xml version="1.0" encoding="utf-8"?>
<!--
/**
 * Copyright © 2015 Magento. All rights reserved.
 * See COPYING.txt for license details.
 */
 -->
<config xmlns:xsi="http://www.w3.org/2001/XMLSchema-instance" xsi:noNamespaceSchemaLocation="../../../../../../../vendor/magento/mtf/etc/pages.xsd">
    <page name="CatalogProductView" area="Product" mca="catalog/product/view">
        <block name="viewBlock">
            <render name="bundle" class="Magento\Bundle\Test\Block\Catalog\Product\View" />
        </block>
    </page>
</config>
Details:
- The PHP class for the page will be generated in the Magento_Catalog module, because we did not mention module attribute in the
pagenode - In the
block, we indicatenameattribute only
Step 4. Run the page generator
To apply all changes you've made to the page (XML file), run the class generator.
php <magento2>/dev/tests/functional/utils/generate.phpThe page will be updated in the <magento2>/dev/tests/functional/generated directory.
Use a render
Let’s take a look at the basic class Magento\Catalog\Test\Block\Product\View, where a render calls the getOptions() method from Magento\Bundle\Test\Block\Catalog\Product\View.
<?php
public function getOptions(FixtureInterface $product)
{
    /** @var CatalogProductSimple $product */
    $dataConfig = $product->getDataConfig();
    $typeId = isset($dataConfig['type_id']) ? $dataConfig['type_id'] : null;

    return $this->hasRender($typeId)
        ? $this->callRender($typeId, 'getOptions', ['product' => $product])
        : $this->getCustomOptionsBlock()->getOptions($product);
}
It contains the getOptions() method that:
-
Gets from the
Bundle/Test/Fixture/BundleProduct.phpfixture thetype_idfield value$dataConfig['type_id']. In our case,type_id='bundle'. -
Calls the
hasRender()method to check if there is a render with the namebundle -
Calls the render if there is a render with the name
bundle
$this->callRender($typeId, 'getOptions', ['product' => $product])
- Calls a default method if the render is absent
$this->getCustomOptionsBlock()->getOptions($product);
Define a selector/locator
There are some rules that should be followed to define a selector:
- Use CSS and XPath strategies.
- To work with forms, use the
nameattribute as a selector. - If an attribute is static (not auto-generated), use the
idattribute. - If you cannot use
id, usedata-*attributes. - We recommend not to use the
classattribute, because it can be changed and not unique very often. - Do not use complex hard-coded structures like
//div/div[2]//tbody//tr[1]/td[0], they can be unpredictably changed. - Do not use enclosed text such as button or label names like
//button[contains(., "Sign in")]