Add Staging and Production to Pro projects UI
For existing Pro plans, you previously had to access Staging and Production environments using SSH access or entering tickets. We have added additional features to the Project Web Interface to directly manage these environments without SSH for specific options.
To add these environments to the Project Web Interface, review this entire document to complete a few preparation steps and enter a ticket.
Please be aware, your ticket will be added to a queue for updating existing Pro projects. The process may take some time to complete. We will update your tickets with details, timing, and updates.
All new projects already include these features.
New projects provisioned October 23, 2017 and later will already have Staging and Production in their Project Web Interface. Any existing projects created before this date will need to enter a ticket to be converted. This information will help you understand the changes and enter a ticket.
New features
The new Project Web Interface provides the following features for Pro plan Staging and Production environments:
- Add and manage user access to the environments
- Sync code between Staging and Production to Integration environments
- Merge code from Integration master to Staging and Production environments
- Add and manage environment variables
- Configure environment settings
- Access the environments by SSH and URL. These links and commands are provided through the Access Links.
- View build logs and deployment history
Restricted features
As an important note, while you can manage Staging and Production environments, you cannot:
- Branch from these environments. Staging and Production only have a single branch for syncing and receiving code from Integration.
- Create snapshots through the interface.
- View deploy logs
You will need to enter support tickets to update and modify the following in Staging and Production:
- Configurations for
.magento.app.yamlandservices.yaml - Cron jobs
- Redirects from
routes.yaml
You will continue to use SSH for:
- Deploy code to Staging and Production
Branch changes
When converted, your branches will be updated. The current branhces include a repository for Integration, Staging, and Production. Each repository has a master branch with deployment targets configured for Staging and Production.
After the conversion, the three repositories are merged into a single repository. You will have the following branches and environments:
| Branch | Environment | Description |
|---|---|---|
| (no branch) | Global Master | This "branch" captures global project changes including adding user accounts and variables. Important: Do not create branches from or merge to Global Master. |
production |
Production | This is a child branch from When you convert, the Integration |
staging |
Staging | This is a child branch from When you convert, the Integration |
master |
Integration | The master branch of the single repository. In the Project Web Interface, this is called Integration. You branch from When you convert, all active and inactive branches continue as children to the |
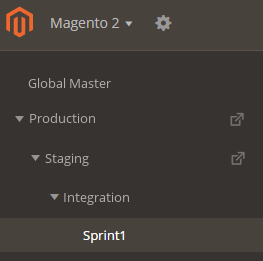
In the Project Web Interface, you will see the following environments and branches:
Be aware, the following actions will trigger a redeploy of the environment. This redeploy is much shorter, not pushing code or data changes.
- Add a user to a specific environment
- Add an environment variable to a specific environment
If you want to add the same variables to your Integration, Staging, and Production environments, we recommend adding all of the variables one at a time to Integration. After you finish adding variables, trigger a deployment to Staging and production. All variables will be inherited from Integration.
Prepare for adding Staging and Production
When we add Staging and Production access to the Project Web Interface, we will leverage the user accounts, branch user permissions, and environment variables from your Integration master environment.
To prepare, ensure you have all settings and environment variables set correctly.
Verify Git code matches across environments
We strongly recommend working in your local development environment then deploying to Integration, Staging, and finally Production. All Git code should match 100% across each of these environments. If you have additional code (for example new extensions) on Production without following this workflow, any deployments from Integration or Staging will overwrite your Production code.
Before entering a ticket, make sure your Git code matches and is synced.
The process will create a new Git branch of code for Staging and Production environments. When we create this code, it will push and overwrite on Production. Do not skip this step.
Verify user account access
We recommend verifying your user account access and permissions set in the Master Integration environment. When adding Staging and Production to the Project Web Interface, all user accounts and settings are used initially. You can modify the settings and values for these environments after they are added.
- Log in to your Magento Commerce (Cloud) account.
- Click the Projects tab and the name of your project.
- Click Master to open the environment information and settings.
- Click
 Configure environment.
 - Click the Users tab to review the user accounts and permission configurations.
- You can add users if needed. Click Add User, enter an email address, and select a permission. These include Admin (change settings, execute action, merge code), Contributor (push code), or Reader (view only).
- To modify the environment permissions for a user, select Edit for the account and change the permissions. These include Admin (change settings, execute action, merge code), Contributor (push code), or Reader (view only). Select a permission and save.
Prepare variables
When we convert your project to the new Project Web Interface, we add variables from Integration master to Staging and Production. You can review, modify, and add variables through the current Project Web Interface prior to conversion.
- Log in to your Magento Commerce (Cloud) account.
- Click the Projects tab and the name of your project.
- Click the Integration
masterbranch to open the environment information and settings. - Click Configure environment.
- On the Variables tab, review the environment variables. To create a new variable, click Add Variable. To update an existing variable, click Edit next to the variable.
For environment-specific variables, including sensitive data and values, you can add those variables after we update your Project Web Interface. If you have environment variables in an env.php file, the file continues working after converting. You can add and manage these variables using the Magento Cloud CLI tool directly into the Staging and Production environments.
Enter a ticket for updating the Project Web Interface
Enter a Support ticket with the suggested title “Connect Stg / Prod to Project’s UI”. In the ticket, request to have your project enabled with Staging and Production in the UI.
We will review the infrastructure and settings, create user and environment variables for Staging and Production environments, and update the ticket with results.
When done, you can access review your project through the Project Web Interface.
(Optional) Migrate environment variables
After conversion, you can manually migrate specific environment variables for Staging and Production.
- Open a terminal and checkout a branch in your local environment.
-
List all environment variables.
magento-cloud variable:list - Log in to your Magento Commerce (Cloud) account.
- Click the Projects tab and the name of your project.
- Click the Staging or Production environment.
- On the Variables tab, review the environment variables.
- Enter the variable name and value.
- Select the Override checkbox if you want variables in the Project Web Interface to override local CLI or database values.
When accessing the Project Web Interface, you should see a hierarchy of branches starting from Production to Staging to Integration. Any branches you create display as children of Integration master. For more information, see Pro architecture.