Prepare your existing Magento Commerce install
You need to prepare your existing Magento Commerce implementation to import it into a new Magento Commerce (Cloud) project. This includes updating and adding files, transfering media files, and migrating data.
Before preparing your project and importing code, push all pending changes to Git. Your remote Magento Commerce (Cloud) branch should be fully updated. When you push, build and deploy scripts run to update code, static content, and environment services.
These import preparation steps include the following:
- Prepare and add required files:
- [Add Cloud-specific files and directories ]to Magento Commerce. Without these files and directories, your Magento Commerce code can’t be imported to Cloud.
- Add Authentication Keys to
auth.json. - Modify your existing
composer.jsonto specify Cloud-specific dependencies. Make sure to include all modules. Cloud uses this file forcomposer installcommands. Addcomposer.lockto Git. Cloud uses this file forcomposer updatecommands and during the build and deploy process. - Transfer media files to Cloud.
- Add your Magento Commerce authentication credentials to
auth.jsonif you haven’t done so already. - Migrate your Magento Commerce data.
Prepare and add required files
To import Magento Commerce code to a Magento Commerce (Cloud) project, you need to add a directory and the following files to your existing code.
.magento.app.yamlmanages applications, service relationships, mounts for writable directories, and cron jobs.magento/services.yamlfor service configurations including MySQL, PHP, Redis, Solr (2.0.X only), ElasticSearch (2.1.X and later).magento/routes.yamlfor handling routes including redirections, caching, and server-side includesmagento-vars.phpfor multiple websites and stores
You need to add these files to your Magento Commerce code:
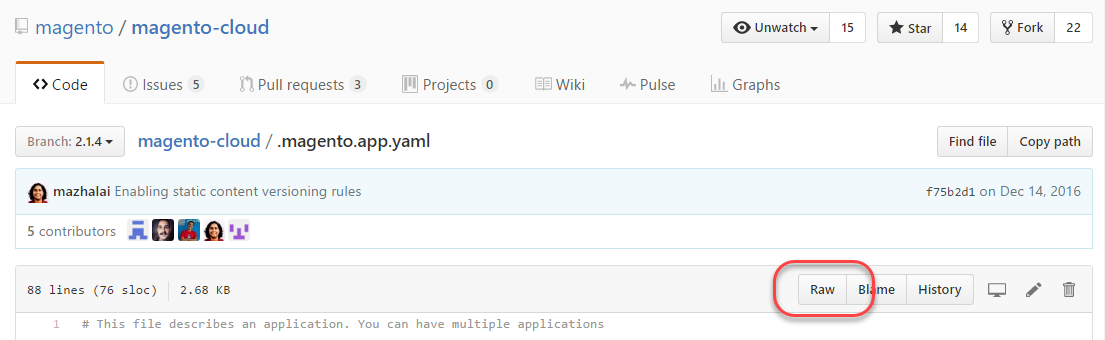
- Go to the Magento Commerce (Cloud) GitHub.
-
Select the branch corresponding to the Magento Commerce version you currently have.
The following figure shows an example of selecting the
2.1.4branch.
In the procedure that follows, you’ll copy the contents of some of these files to your Magento Commerce system.
- Log in to your Magento Commerce system as, or switch to, the Magento file system owner.
-
Enter the following commands in the order shown:
cd <Magento installation dir> mkdir .magento -
One at a time, create the following files in your Magento Commerce system using the contents of the files in the Magento Commerce (Cloud) GitHub:
<Magento Commerce install dir>/.magento.app.yaml<Magento Commerce install dir>/magento-vars.php<Magento Commerce install dir>/.magento/services.yaml<Magento Commerce install dir>/.magento/routes.yaml
For example, to create
<Magento Commerce install dir>/.magento.app.yamlfrom the 2.1.4 branch:- In the Magento Commerce (Cloud) GitHub, click .magento.app.yaml.
-
In the upper right, click Raw, as the following figure shows.
- In your Magento Commerce project, open a text editor in the Magento Commerce installation directory (for example,
/var/www/html/magento2). - Paste the raw contents of
.magento.app.yamlfrom GitHub into the text editor. - Make sure the file is named
.magento.app.yamlwhen you save the file. -
Repeat these tasks for the other files.
- Make sure to create
magento-vars.phpin the Magento root directory. - Make sure to create
routes.yamlandservices.yamlin the.magentosubdirectory.
- Make sure to create
Modify these files as necessary as discussed in the following topics:
When you push your code, all services are configured into the associated environment per active branch of code. These files affect all Starter environments and all Pro Integration environments. To update these settings in Pro Staging and Production, you need to enter a ticket.
Add or update auth.json with Magento Authentication keys
To enable install and update commands for Magento Commerce (Cloud), you must have an auth.json file in your project’s root directory. auth.json contains your Magento Commerce authorization credentials for Magento Commerce (Cloud).
In some cases, you might already have auth.json. Verify if you have the file and add your authentication credentials before you create a new one. It’s located in your Magento root directory. You can also get a sample auth.json.
To create a new auth.json in the event you don’t have one:
- Use a text editor to create a file named
auth.jsonin your Magento root directory. -
Replace
<public-key>and<private-key>with your Magento Commerce authentication credentials.See the following example:
{ "http-basic": { "repo.magento.com": { "username": "<public-key>", "password": "<private-key>" } } } - Save your changes to
auth.jsonand exit the text editor.
Edit composer.json
Before you push code to the Magento Commerce (Cloud) Git repository, modify your composer.json for Cloud. You can also view a sample composer.json.
To edit composer.json:
- If you haven’t done so already, log in to your Magento Commerce (Cloud) server as the Magento file system owner.
- In a text editor, open
composer.jsonin the project root directory. -
Substitute the following value in the
requiresection:"magento/product-enterprise-edition": "<version>",with
"magento/magento-cloud-metapackage": "<version>",Both
<version>values must be the same. For example, if your current Magento Commerce version is 2.1.9, yourmagento-cloud-metapackageversion must also be 2.1.9. -
Update the
"files"directive in theautoloadsection to refer toapp/etc/NonComposerComponentRegistration.phpas follows:"autoload": { "psr-4": { "Magento\\Framework\\": "lib/internal/Magento/Framework/", "Magento\\Setup\\": "setup/src/Magento/Setup/", "Magento\\": "app/code/Magento/" }, "psr-0": { "": "app/code/" }, "files": [ "app/etc/NonComposerComponentRegistration.php" ] } - Save your changes to
composer.jsonand exit the text editor. - In the terminal application, run
composer updateto updatecomposer.lock. Wait while dependencies are updated. -
Commit the changes to GitHub:
git add -A && git commit -m "Add Cloud files" && git push origin <branch name>
Back up and transfer media files
Use the command magento setup:backup --media to back up media files:
- Get the integration system’s SSH URL.
-
To back up media files, enter the following command:
php <Magento Commerce install dir>/bin/magento setup:backup --mediaThe backup is stored in the
<Magento Commerce install dir>/var/backupsdirectory. -
Transfer the media file to your Magento Commerce (Cloud) system:
rsync <Magento Commerce install dir>/var/backups/<backup file name> <cloud ssh url>:var/media.tgzFor example,
rsync /var/www/html/magento2/var/backups/1487962699_filesystem_media.tgz 43bkopvkhelhy-master-l8uv4kp@ssh.us.magentosite.cloud:var/media.tgz
Copy the encryption key
To be able to decrypt encrypted data from your imported database, copy your encryption from your existing env.php file. Every environment inIntegration, Staging, and Production has an env.php of sensitive data and environment variables. The file contains a nested PHP array storing configuration data.
- Open
<Magento install dir>/app/etc/env.phpin a text editor. - Search for the value of
keyin thecryptarray. - Copy the value to the clipboard and save it.
You must paste the encryption key into your Magento Commerce (Cloud) env.php file in each environment in a later step.
Migrate Magento Commerce data
Create a database dump and transfer the data from an existing database. You will import this data to your Magento Commerce (Cloud) database.
The following command example compresses the dump so it doesn’t significantly interfere with traffic from in live site. The dump file is named db.sql.gz. You may want to include the date in the file name if you do multiple dumps over time. Because the database dump can be large, we recommend you create it in a directory not tracked by Git.
-
In your existing environment, create a database dump.
mysqldump -h <db-host> -P <db-port> -p -u <db-user> <db-name> --single-transaction --no-autocommit --quick | gzip > ~/db.sql.tgz
For example, if your database is on localhost with the default port (3306), database user name is magento, and database name is also magento:
mysqldump -p -u magento magento --single-transaction --no-autocommit --quick | gzip > ~/db.sql.tgz
-
Use the
rsynccommand to transfer the database dump to the Magento Commerce (Cloud) environment in thevardirectory of the application you are importing into:rsync <db dump file name> <cloud SSH URL>:var/db.sql.gz
To find <cloud SSH URL>, see Find the information you need for your import.