Clone and branch the project
Previous step:
Set up the Magento file system owner
The Magento Commerce project is a Git repository of Magento code with a master origin. Develop your custom code and add extensions in one of eight active Git branches in your local. Each active environment includes a database and services to fully access the Magento site and store in the Integration environment.
To begin, you need to clone the master environment to your local and add the Magento Admin URL, username, and password (to include with all branches). If you are new to Git workflow, processes, and commands, see Git documentation.
The commands in these instructions use Magento CLI commands and Git commands to access the master environment. For a full list of Magento Cloud CLI commands, enter magento-cloud list or see the Magento CLI reference.
You should complete these instructions in the following order:
- Clone the project master branch
- Change the Magento Admin URL, user name, and password on master
- Branch an environment
Clone the project master branch
To clone the project’s master environment to your local:
-
Log in to your local development machine with a Magento file system owner account.
-
Change to the web server or virtual host docroot.
-
Log in to the Magento Cloud CLI:
magento-cloud login -
List your projects:
magento-cloud project:list -
Clone a project.
magento-cloud project:get <project ID>When prompted for a directory name, enter
magento2. - Change to the project directory:
cd magento2. -
List environments in the project:
magento-cloud environment:listmagento-cloud environment:listdisplays environment hierarchies whereasgit branchdoes not. If you have any nested environments, usemagento-cloud environment:list. -
Fetch remote branches:
git fetch magento -
Pull updated code:
git pull magento <environment ID>
Change the Magento Admin URL, user name, and password on master
We recommend changing the following variables for the Magento Admin URL and administrator account. You should configure these settings for security reasons prior to branching from the cloned master. If you change the variables in the master branch, you only have to make these changes once. All branches inherit the variables from master.
ADMIN_EMAIL: Administrative user’s e-mail address. This value is required for upgrading and patching Magento Commerce (Cloud) and is used to send password reset emails.ADMIN_USERNAME: User name for a Magento administrative user. This user is an administrator and can create other users, including other administrative users. The default hardcoded username isadmin. You can useadminor change it to another secure username.ADMIN_PASSWORD: Administrative user’s password. When the project is created, a random password is generated and an email is sent to the Project Owner. During project creation, the Project Owner should have already changed the password. You may need to contact the Project Owner for the updated password.ADMIN_URL: The relative URL by which to access the Magento Admin. For example:/admin. For security reasons, we recommend you choose a value other than `admin` or `backend` or another term that is easy to guess.
Make note of any changes you make. You may need them when installing Magento with the command line and when verifying the installation.
List and review variables
If you’re not sure whether or not the master branch has all Magento Admin variables and settings configured, open a terminal, login to the Magento Cloud CLI, and enter the following command. This command lists any configured and available variables.
magento-cloud variable:get -e <environment ID>
To set Admin variables, you will use this command format:
magento-cloud variable:set <name> <value> -e <environment ID>
You can also log into your project in the Project Web Interface to review project variables entered there. Click the Configure environment gear icon  next to the Project name. Click the Variables tab and review any configured variables there.
Everytime you add or modify a variable using the web interface or the CLI, the branch will redeploy automatically.
Add variables using the CLI
To set variables using the CLI (with example values used):
-
To set the administrator’s user name to
admin_A456in themasterenvironment, enter:magento-cloud variable:set ADMIN_USERNAME admin_A456 -e master - Wait for the project to redeploy.
-
To set the administrator’s password to
admin_A456, enter:magento-cloud variable:set ADMIN_PASSWORD admin_A456 -e master - Wait for the project to redeploy.
-
To set the Admin URI to
magento_A8v10, enter:magento-cloud variable:set ADMIN_URL magento_A8v10 -e master - Wait for the project to redeploy.
-
Log in to the Magento Admin using the values you just changed.
The simplest way to do that is to use the environment routes that display when you redeploy the
masterbranch. The following example uses these values:<pre class="no-copy">Building application 'mymagento' (runtime type: php:7.0, tree: 07263ba) Slug already built for this tree id, skipping. Re-deploying environment k4wtvm7ogzr5s-master. Environment configuration: mymagento (type: php:7.0, size: S, disk: 2048) mysql (type: mysql:10.0, size: S, disk: 2048) redis (type: redis:3.0, size: S) solr (type: solr:4.10, size: S, disk: 1024) Environment routes: http://master-k4wtvm7ogzr5s.us.magentosite.cloud/ is served by application `mymagento`</pre>In the preceding example, go to
http://master-k4wtvm7ogzr5s.us.magentosite.cloud/magento_A8v10and log in using the user nameadmin_A456and passwordadmin_A456 -
After the project redeploys, take a snapshot of the master branch:
magento-cloud snapshot:create -e master
Add variables using the Project Web Interface
To set variables using the Project Web Interface:
- Log in to your Magento Commerce (Cloud) account.
-
Click the Configure environment gear icon
next to the Project name. If you are asked to create the project, click Continue Later.
- Select the Variables tab.
- Click Add Variable.
-
For the Name, enter
ADMIN_EMAIL. For the Value, enter your Project Owner email address or another accessible email for resetting the password for the default admin account.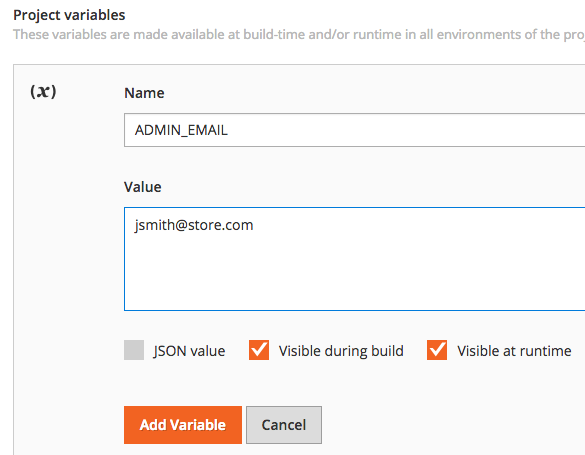
- Click Add variable. After you add the variable, the environment will deploy. Wait until deployment completes.
Repeat to optionally add the following variables using the examples above:
- Name:
ADMIN_USERNAME, Value: admin_A456 - Name:
ADMIN_PASSWORD, Value: admin_A456 - Name:
ADMIN_URL, Value: magento_A8v10
Branch an environment
With your project cloned and Magento administrator account configured, you can branch for development.
- For Starter, consider creating a branch for
staging, than branch fromstagingfor development. - For Pro, create branches in the Integration environment for your development.
To branch from master:
-
Do any of the following:
-
To create a new environment, enter the following command:
magento-cloud environment:branch <environment name> <parent environment ID> -
To check out an existing environment, enter the following command:
magento-cloud environment:checkout
For example, to create a new branch named
sprint1from master, enter:magento-cloud environment:branch sprint1 master -
-
After the command completes, update dependencies:
composer --no-ansi --no-interaction install --no-progress --prefer-dist --optimize-autoloader -
Create a snapshot of the environment.
magento-cloud snapshot:create -e <environment ID>