Pro develop and deploy workflow
The Magento Commerce (Cloud) Pro plan includes a single, Git repository with a Global Master and three, main environments: the Integration environment for development and testing, the Staging environment for testing with all services, and the Production environment to go live. See Pro architecture for an overview.
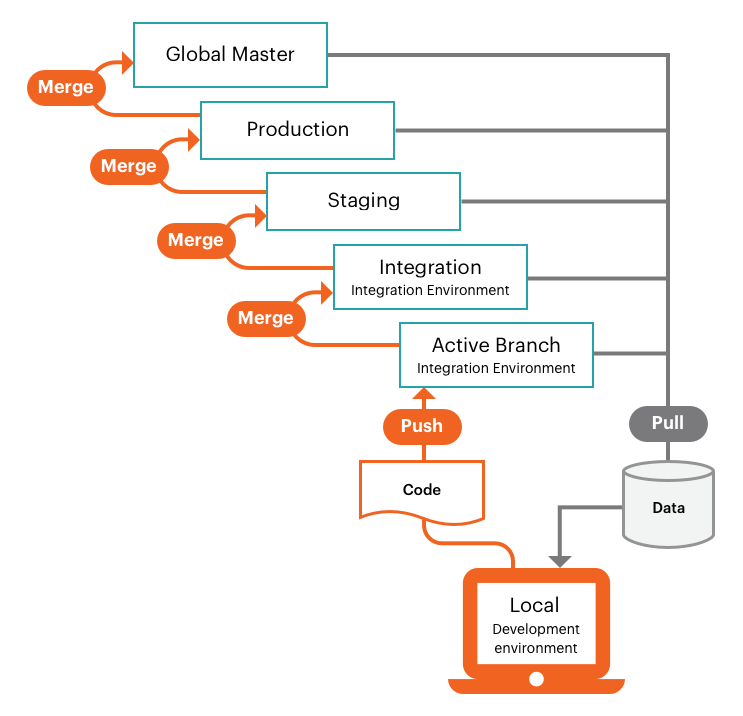
The following graphic demonstrates the Pro develop and deploy workflow, which uses a simple, git-branching approach. You develop code using an Active branch based on the Integration environment branch, pushing and pulling code changes to and from your remote, Active branch. You deploy verified code by merging the remote branch to the base branch, which activates an automated build and deploy process for that environment.
For Pro projects created before October 23, 2017, the architecture is slightly different. See Pro architecture (legacy).
Development workflow
The Integration environment provides a single, base integration branch containing your Magento Commerce (Cloud) code. You can create up to four additional branches for developing your custom code, extensions, and third party integrations. This allows for a maximum of five active branches deployed to Platform-as-a-Service (PaaS) containers.
The Magento Commerce (Cloud) environments support a flexible, continuous integration process. Begin by cloning the integration branch to your local project folder. Create a new branch, or multiple branches, to develop new features, configure changes, add extensions, and deploy updates:
- Fetch changes from
integration - Branch from
integration - Develop code on local workstation
- Push code changes to remote and validate
- Merge to
integrationand test
With a developed code branch and the corresponding configuration files, your code changes are ready to merge to the integration branch for more comprehensive testing. The Integration environment is also best for:
- Integrating third party services—Not all services are available in the PaaS environment.
- Generating configuration management files—Some configuration settings are Read Only in a deployed environment.
- Configuring your store—You should fully configure all store settings using the Integration environment. You can find the Store Admin URL on the Integration environment panel in the Project Web Interface.
Deployment workflow
Every time you push code from your local workstation to the remote environment or merge code to a base environment branch, the build and deploy scripts generate new Magento code and provision configured services to the remote environment.
Build script actions:
- Site in the target environment continues to run during a build
- Check and run Magento Commerce (Cloud) patches and hot fixes
- Compile code with a build and deploy log
- Check for Configuration Management, static content deploy occurs during this phase
- Create or use a slug of unchanged code to speed up the process
- Provision all backend services and applications
Deploy script actions:
- Place site in the target environment in a Maintenance mode
- Deploy static content if not completed during Build
- Install or update Magento Commerce (Cloud)
- Configure routing for traffic
After the build and deploy process, your store comes back online with your latest code changes and configurations. See Deployment process.
Merge to Integration
Combine all verified code changes by merging your Active development branch into the base integration branch. You can test all your changes on the integration branch before promoting changes to the Staging environment.
Merge to Staging
Staging is a pre-production environment that provides all services and settings as close to the Production environment as possible. You should always push your code changes in iterations to your Staging environment for full testing that includes all services. The first time you use the Staging environment, you must configure services, such as Fastly CDN, Blackfire Profiler, and New Relic APM. Also, we recommend configuring payment gateways, shipping, notifications, and other vital services with sandbox or testing credentials.
It is best to thoroughly test every service, verify your performance testing tools, and perform UAT testing as an administrator and as a customer, until you feel that your store is ready for the Production environment. See Deploy your store.
Merge to Production
After thorough testing in the Staging environment, merge to the Production environment and thoroughly test using live credentials. The moment you go live, customers must be able to complete purchases and administrators must be able to manage the live store. We provide a detailed, clear walk-through for deploying your store and going live:
- See Deploy your store
- See Go live and launch
Merge to Global Master
You should always push a copy of the Production code to the Global Master in case there is an emergent need to debug the Production environment without interrupting services.
Do not create a branch from Global Master. Use the integration branch to create new, active branches for development and fixes.