Configure your project
The Magento Commerce (Cloud) Project Web Interface enables you to do the following for all Starter and Pro environments:
- Access projects
- Create and manage projects
- Access active environments and branches using SSH, CLI, and URLs
- Configure environment settings, environment variables, and routes
- Create and manage users
- Manage Git branches
As you make changes to these settings, the branch redeploys to the environment. You can make these setting changes for all Starter and Pro environments.
Updating your Pro project: These sections include instructions for Pro projects with Staging and Production available in the Project Web Interface. To add Staging and Production to your interface, see Add Staging and Production to Pro projects UI.
We can update Pro projects created before October 23, 2017. All new Pro projects include these features. Your ticket will be queued for update, which may take time to complete. We will keep you updated through the process.
If you do not request this update, you must use CLI commands or tickets to modify settings, variables, routes, and more for Pro plan Staging and Production environments.
Access your project and environments
The Project Web Interface provides several ways to access your project and environments:
- Storefront URL for each active environment
- Secure Shell (SSH) link for SSH access via terminal application
- Clone the project using the Magento Cloud CLI or Git
To access projects and environments through the Project Web Interface:
- Log in to your project.
-
Click Access Project for a list of URLs and SSH.
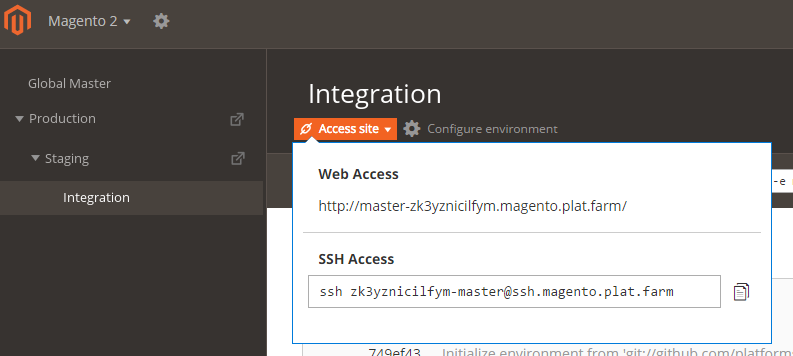
For more information about using SSH, see SSH to an environment. To clone the project using either the Magento Commerce (Cloud) CLI or Git, use the links in the field under the branch name.
The following figure shows an example.

Click either CLI or Git to display the appropriate clone command. Use the  (Copy to clipboard) button to copy the command to the clipboard.
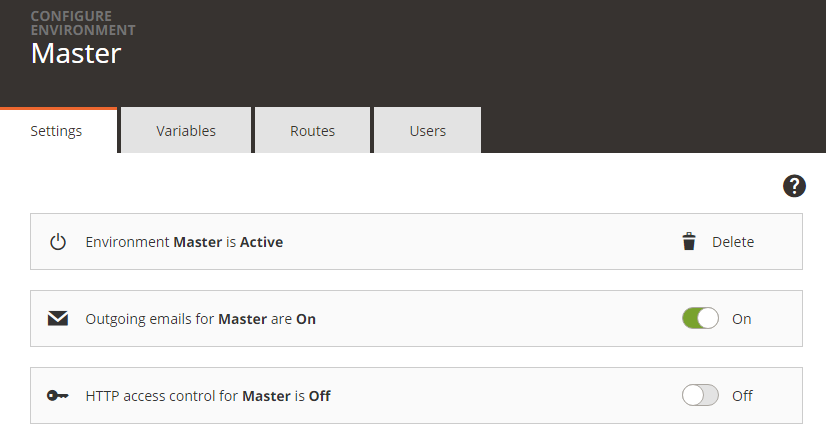
Configure environment settings
You can set environment settings for the following table of settings. These settings affect your Starter environments and Pro Integration environments. To modify settings for Pro plan Staging and Production environments, you need to enter a Support ticket.
| Option | Description |
|---|---|
| Environment status | An environment can be either active or inactive. You'll do most of your work in an active environment. After merging an environment with its parent, you can optionally delete the environment, making it inactive. To delete an environment, click Delete. You can active an inactive environment later. |
| Outgoing emails | Setting to On means that code in your environment can send and receive e-mails (for example, using PHP email() function. |
| HTTP access control | Setting to On enables you to configure security for the project's Web Interface using a login and also IP address access control. |
Configure emails for testing
One of these environment variables enables or disables outgoing emails for the environment. If you wanted to test email notifications for the environment, you need to set this option On.
- Access your project and select a specific environment.
- Select the Settings tab.
-
For the Outgoing emails option, select the toggle to On.
Configure your email notifications, services, and more as needed through the Magento Admin and test emails. If you need to enable this setting for Pro plan on Staging and Production, you will need to enter a Support ticket.
Set environment and project variables
You can set project wide and environment specific variables through the Project Web Interface. Variables can be either text or JSON format. For more information, see Environment variables.
For an example of variables, we walk you through creating Magento Admin variables through Onboarding and project creation tasks. You may want to add environment variables for sensitive data like payment method information. Project variables are set across all branches and environments.
To view or edit environment variables, you must have at minimum the project reader role with environment admin privileges.
For new Pro projects created after October 23, 2017, you can add variables for all environments through the Project Web Interface.
If you want to add the same variables to your Integration, Staging, and Production environments, we recommend adding all of the variables one at a time to Integration. After you finish adding variables, trigger a deployment to Staging and production. All variables will be inherited from Integration.
Environment variable
To set environment specific variables in the Project Web Interface:
- Access your project and select a specific environment.
- Select the Variables tab.
- Click Add Variable.
- In the Name field, enter a variable name. For example, to set the Magento Admin default account password, enter
ADMIN_PASSWORD. -
In the Value field, enter the value for the variable. For example, enter a valid email address accessible for reset email notifications.
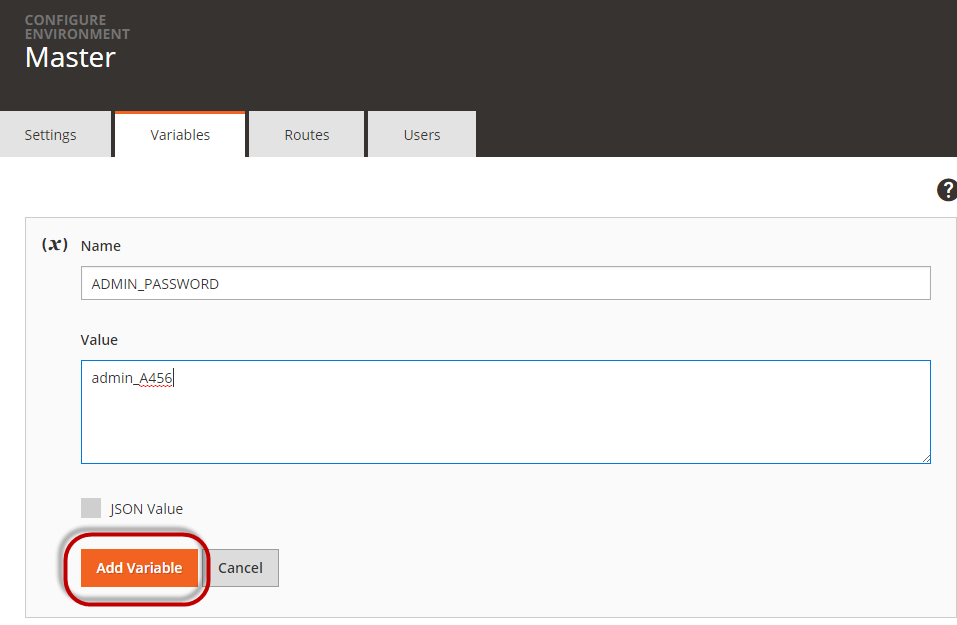
- As needed, select options for JSON value, Visible during build, and Visible during runtime. If you do not have Super User access, you may only see the JSON value option.
- Click Add Variable. After you add the variable, the environment will deploy. Wait until deployment completes before more edits.
If you’re attempting to override Magento configuration settings, you must prepend the variable name with env:. For example:

Project variable
To set project variables in the Project Web Interface:
- Access your project and select a specific environment.
- Select the Variables tab.
- Click Add Variable.
- In the Name field, enter a variable name. For example, to set the Magento Admin email for the default account, enter
ADMIN_EMAIL. -
In the Value field, enter the value for the variable. For example, enter a valid email address accessible for reset email notifications.
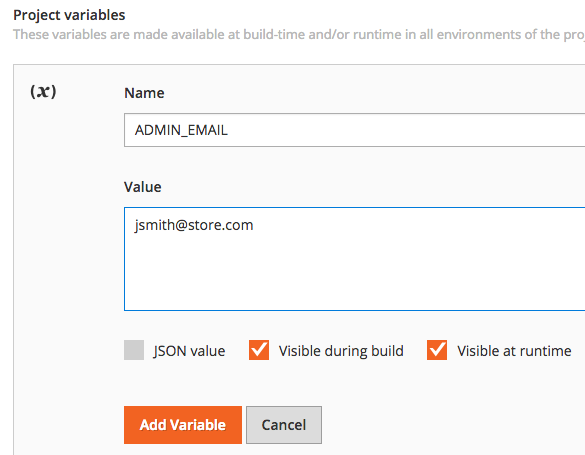
- As needed, select options for JSON value, Visible during build, and Visible during runtime. If you do not have Super User access, you may only see the JSON value option.
- Click Add Variable. After you add the variable, the environment will deploy. Wait until deployment completes before more edits.
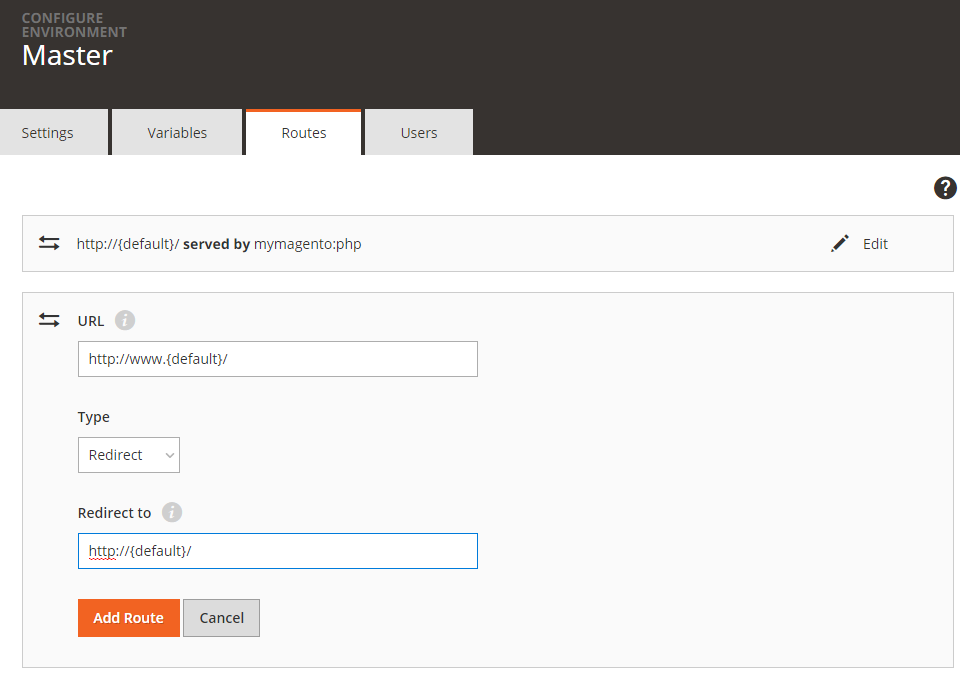
Configure routes
Routes allow you to set redirects or upstream settings for applications for your specific environment. For full details on routes, see routes.yaml. These routes (or URLs) are used to access your Magento storefront.
- Access your project and select a specific environment.
- Select the Routes tab.
- Select Add Route.
- Enter a URL. You can use
{default}in the URL, which is a placeholder for the default domain. - Select a Type: Upstream for applications or Redirect.
-
To configure an Upstream route:
- Enter the Upstream route.
- Use the toggle to enable or disable the Cache for the route.
- Enter the cookies to list: No cookies, All cookies, or Specify a specific cookie. You can enter multiple specific cookies.
- For Headers to Whitelist, select Default Headers or Specify a header. You can enter multiple headers.
- Use the toggle to enable or disable the Server-Side Includes (SSI).
- To configure a Redirect, enter a URL to Redirect to. You can use
{default}in the URL, which is a placeholder for the default domain. - Click Add Route to save. The setting is saved and deployed to the environment.
View environment history
An environment’s history includes:
- Initial creation
- Snapshots
- Syncs and merges
- Code pushes
To view an environment’s history, log into your project and select an environment. The page displays a general history of actions completed on the page. For a detailed list of completed actions during build and deployment, we recommend reviewing logs directly on the servers. For more information on logs, see Use logs for troubleshooting.
The following figure shows a sample history.
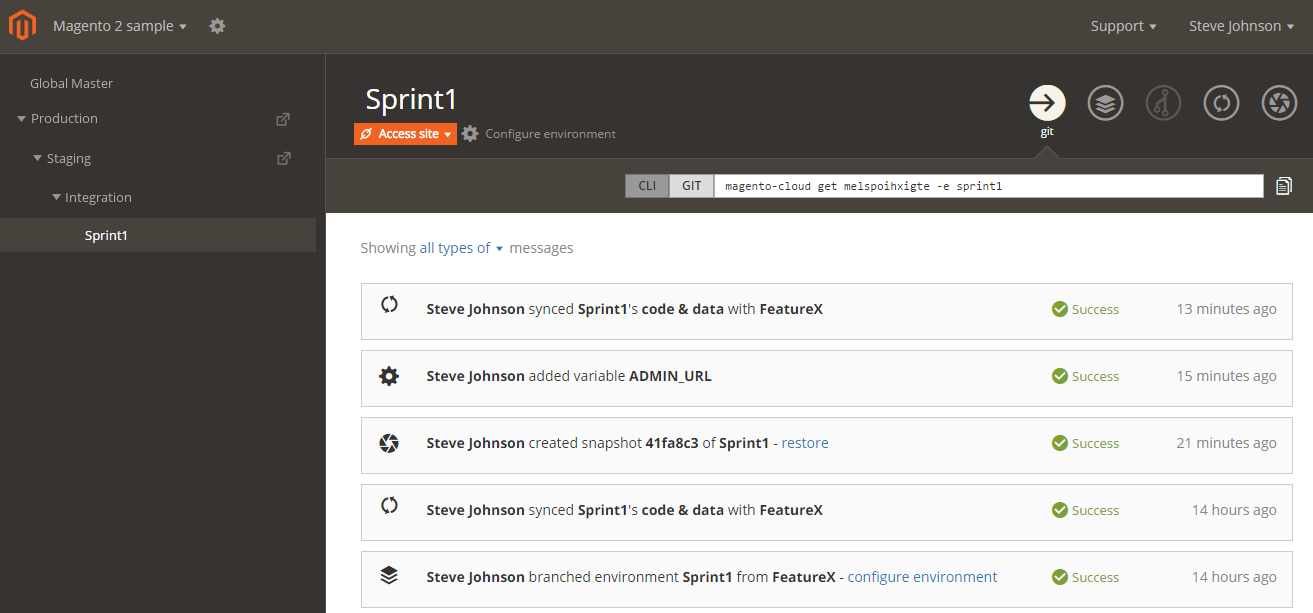
The history shows, from oldest to newest:
- Environment branched from
FeatureX - Environment synced with the parent
- Environment snapshot created
We recommend creating a snapshot before you make any code changes.
- Environment variable added
- Environment snapshot created