Prepare to deploy to Staging and Production
Previous step:
When you are ready to deploy your store, you need to complete deployment and testing in Staging first, then deploy to Production. The Staging environment provides a near-production environment with full services (including Fastly, New Relic, and Blackfire), database, web server, and more.
This information is broken down into prerequisite steps for Starter and Pro projects.
Starter plan projects
For Starter, make sure all of your code is merged into a single development branch to test prior to deployment to Production. Due to all of your branches and environments being on a PaaS infrastructure, you only need access information for Master Production and other environments as needed. This access information includes your store URLs and SSH link.
You can deploy to your environments, including all .yaml configuration files, migrate files and data, all through CLI commands using SSH.
To prepare your environments for full deployment, you need:
- Get your access URLs and SSH information.
- Set up your SSH agent for easier file and data migration.
Get your Starter access URLs and SSH information
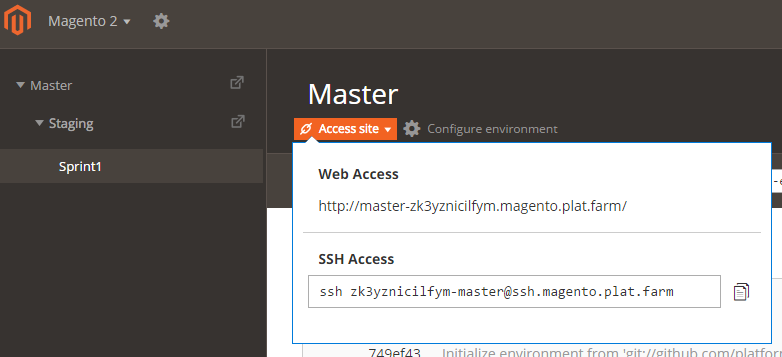
You can locate your URLs through the Project Web Interface. For each selected environment or branch, you will find an Access Site link. Your environments begin with Master, which is Production, and any additional branches you create, including Staging (recommended) and development branches for custom code.
- Log in to your Magento Commerce (Cloud) account.
- Select an environment.
-
Click Access site to display the URL and SSH information.
Pro plan projects
For Pro plan projects, make sure to complete all development and merging of your code to the master branch in the Integration environment. Only the master branch is deployed to Staging then Production.
Updating your Pro project: These sections include instructions for Pro projects with Staging and Production available in the Project Web Interface. To add Staging and Production to your interface, see Add Staging and Production to Pro projects UI.
We can update Pro projects created before October 23, 2017. All new Pro projects include these features. Your ticket will be queued for update, which may take time to complete. We will keep you updated through the process.
If you do not request this update, you must use CLI commands or tickets to modify settings, variables, routes, and more for Pro plan Staging and Production environments.
For first time setup to migrate your database and deploy code to Staging or Production, you will:
- Create a support ticket to migrate deployment hooks. In this ticket, include your public SSH keys to add to Staging and Production.
- Get your access URLs and SSH for Staging and Production.
- Set up your SSH agent for Staging and Production.
If your project was created before October 23, 2017, you also need to set up remote Git repositories on Staging and Production. Deployment targets are already set up on Staging and Production for projects created after October 23, 2017.
If you haven’t done so already, upload any Fastly VCL snippets in your Integration environment master Magento Admin panel. Fastly is available in Staging and Production.
Migrate your .magento.app.yaml file
Important: If you have not modified the default deployment hooks or configurations, skip this step and continue with Get your Pro access URLs. Only migrate the file if you modified the deployment hooks or added configuration updates.
For technical reasons, you must enter a Support ticket to add your .magento.app.yaml file to Staging and Production environments. This affects all Pro projects created before and after October 23, 2017.
You can request that we push .magento.app.yaml, services.yaml, and routes.yaml, set up cron jobs, and enable Xdebug and PHPUnit, which assists you in troubleshooting coding issues encountered during deployment. Because of the memory requirements, we recommend you disable Xdebug before your site is live.
If you added your SSH keys to the Staging and Production environments, you can also directly SSH into the environment to use the Git CLI commands for deployments.
Optionally, you can replace the hooks section with a shell script that you can maintain without intervention. You need only to create a support ticket the first time you use the shell script.
Get your Pro access URLs
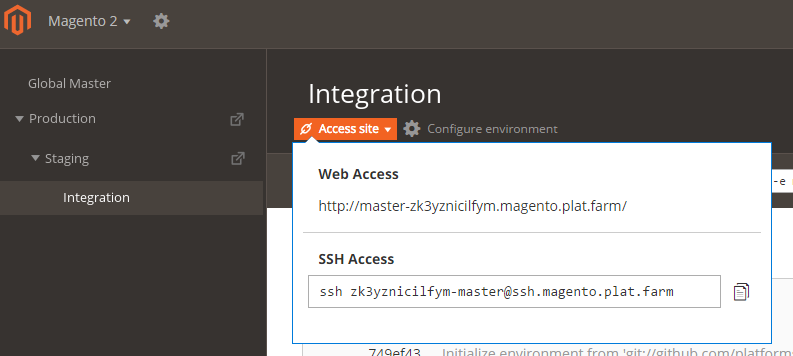
For Pro projects created after October 23, 2017, you can locate your URLs through the Project Web Interface. For each selected environment or branch, you will find an Access Site link.
For Pro projects created before October 23, 2017, you would need to access the information we provided when creating your account. This information is typically provided in a OneDrive onboarding document that contains your Git, SSH, and project URLs for Staging and Production. You’ll use this information for accessing the environments.
-
Git URL format:
- Staging:
git@git.ent.magento.cloud:<project ID>_stg.git - Production:
git@git.ent.magento.cloud:<project ID>.git
- Staging:
-
SSH URL format:
- Staging:
<project ID>_stg@<project ID>.ent.magento.cloud - Production:
<project ID>@<project ID>.ent.magento.cloud
- Staging:
-
Web URL format:
- Staging:
http[s]://staging.<your domain>.c.<project ID>.ent.magento.cloud - Production:
http[s]://<your domain>.c.<project ID>.ent.magento.cloud
- Staging:
Set up Pro remote Git repositories
For Pro projects created after October 23, 2017, you do not need to complete this step. Your Staging and Production environments are branches of master with configured deployment targets. You can simply merge code to these environments from Integration master. You can also use the Project Web Interface to merge your code without SSH or Git commands.
For Pro projects created before October 23, 2017, you will need to initially set up remote Git repositories for Staging and Production. For these classic Pro accounts, your Staging and Production environments have dedicated Git repositories. You only need to set these up once.
When you know your Git URLs, you need to set them up as remote upstream repositories so you can push code to them. Basically, you configure these remote repositories using these instructions to SSH into the environements and push code and migrate data and files using Git commands.
Using a terminal connection, enter Git commands to add the remote repositories.
The Git command syntax is:
git remote add <remote repository name> <remote repository URL>
The following commands are examples for setting up remotes on Staging and Production:
git remote add staging git@git.ent.magento.cloud:dr5q6no7mhqip_stg.git
git remote add prod git@git.ent.magento.cloud:dr5q6no7mhqip.git
Set up your SSH agent and add the SSH key
You only need to set up your SSH agent on these servers once. SSH agent helps contain is a background program that handles passwords for your SSH private keys.
How it works! After you configure the agent and settings, you can migrate files easier using SSH or scp between servers. The SSH agent forwards authentication requests from Staging or Production environments to your local with a working Magento system, helping you connect using your local private SSH key. After you push your Git code, you can SSH into Staging and Production and update code, data, and files with this set up.
You can use any terminal client you prefer for SSH access, or see our Recommendeds tools. For these examples, we use the OpenSSH client.
To set up an SSH agent:
- In a terminal client, log in to your local system.
-
Enter the following command to check if the SSH agent is running and list fingerprints of all identities currently represented by the agent:
ssh-add -lOne of the following messages displays:
-
Displays a working and running SSH agent:
2048 ab:de:56:94:e3:1e:71:c3:4f:df:e1:62:8d:29:a5:c0 /home/magento_user/.ssh/id_rsa (RSA)Skip to step 4.
-
The SSH agent has not started:
Could not open a connection to your authentication agent.Continue with step 3.
-
-
To start the SSH agent, enter the following command:
eval $(ssh-agent -s)The agent starts and displays the process ID (PID).
-
Add your public SSH key to the agent to SSH into environments and complete Git commands. This is the same SSH key you provided in a ticket for access to Staging and Production.
ssh-add ~/.ssh/id_rsaA message similar to the following displays:
Identity added: /home/magento_user/.ssh/id_rsa (/home/magento_user/.ssh/id_rsa)
For more information on setting up SSH, see Enable SSH keys as part of your local setup. For Starter and Pro projects, you can add your SSH public key to all Integration, Staging and Production environments.
If you have a Pro project created before October 23, 2017, you need to enter a ticket with your public key to have it added to Staging and Production.