Install, manage, and upgrade extensions
This information includes information for adding extensions to Magento Commerce (Cloud), managing enabled and disabled extensions, and upgrading extension code.
When adding extensions to Magento Commerce (Cloud), you should add the code to a Git branch, test in Integration, deploy and test in Staging, before finally pushing and using in Production.
Extensions include the following:
- Modules to extend Magento capabilities, with options through Magento Marketplace and directly through company sites
- Themes to change the look and feel of your storefronts
- Language packages to localize the storefront and Admin
These instructions walk through extension installation purchased from Magento Marketplace. You can use the same procedure to install any extension with the extension’s Composer name. To find it, open the extension’s composer.json file and note the values for "name" and "version".
We also include instructions for updating extensions.
Create a branch for adding or updating the extension
We recommend using a branch for adding or updating, configuring, and testing your extension.
- Log in to your local development system, or switch to, the Magento file system owner.
- Change to a directory to which the Magento file system owner has write access.
-
Enter the following command in a terminal to log in to your project:
magento-cloud login -
List your projects. With the project ID, you can complete additional commands.
magento-cloud project:list -
If necessary, clone the project to your local. You should have cloned when setting up your local development workspace.
magento-cloud project:get <project ID> - Change to a project directory. For example,
cd /var/www/html/magento2 -
List environments in the project. Every environment includes an active Git branch of your code, database, environment variables, configurations, and services.
magento-cloud environment:listmagento-cloud environment:listdisplays environment hierarchies whereasgit branchdisplays does not. If you have any nested environments, usemagento-cloud environment:listto see the full list. -
Fetch origin branches to get the latest code:
git fetch origin -
Check out, or switch to, a specific branch and environment. Git commands only checkout the Git branch. The Magento Cloud command also switches to the active environment.
magento-cloud environment:checkout <environment ID>To create a new environment, use
magento-cloud environment:branch <environment name> <parent environment ID> -
Pull any updated code to your local for the environment ID (which is the Git branch):
git pull origin <environment ID> -
Create a snapshot of the environment as a backup:
magento-cloud snapshot:create -e <environment ID>
Install an extension
Extension installation uses the following steps:
- Purchase an extension or module from Magento Marketplace or another site.
- Create a branch to work with the files.
- Get the extension’s Composer name and version from your purchase history.
- In your local Magento Commerce (Cloud) project, update the Magento
composer.jsonfile with the name and version of the extension and add the code to Git. The code builds, deploys, and is available through the environment. - Verify the extension installed properly.
Step 1: Get the extension’s Composer name and version
If you already know the extension’s Composer name and version, skip this step and continue with Update Magento’s composer.json.
This section discusses how to get a module’s Composer name and its version from Magento Marketplace. Alternatively, you can find the name and version of any module (whether or not you purchased it on Marketplace) in the module’s composer.json file. Open composer.json in a text editor and write down the values of "name" and "version".
To get the module’s Composer name from Magento Marketplace:
- Log in to Magento Marketplace with the user name and password you used to purchase the component.
-
In the upper right corner, click <your user name> > My Account as the following figure shows.

-
On the My Account page, click My Purchases as the following figure shows.

-
On the My Purchases page, click Technical Details for the module you purchased as the following figure shows.
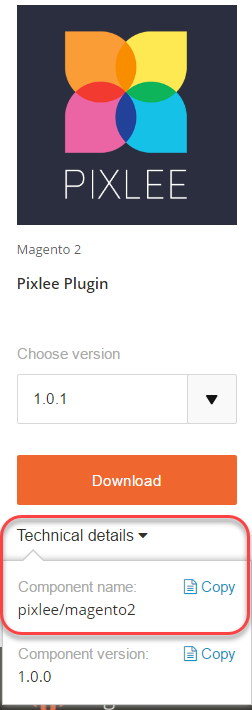
- Click Copy to copy the component name to the clipboard.
- Open a text editor.
- Paste the module name in the text editor.
- Append a colon character (
:) to the component name. - In Technical Details on the My Purchases page, click Copy to copy the version to the clipboard.
-
Append the version number to the component name after the colon.
A sample follows:
pixlee/magento2:1.0.1
Step 2: Update Magento’s composer.json
When adding the module to composer.json, the file app/etc/config.php will also be updated. This file includes a list of installed modules, themes, and language packages, shared configuration settings. This file also includes Configuration Management (Pipeline Deployment) values too.
To update composer.json:
- If you haven’t done so already, change to your environment root directory.
-
Enter the following commands to update it:
composer require <component-name>:<version> --no-update
composer update
For example:
composer require pixlee/magento2:1.0.1 --no-update composer update - Wait for project dependencies to update.
-
Enter the following commands in the order shown to commit your changes, including
composer.lock:git add -A git commit -m "<message>" git push origin <environment ID>
If there are errors, see extension deployment failure.
Step 3: Verify the extension
To verify the extension installed properly, you can check its functionality in the Magento Admin or you can make sure it is enabled as follows:
- Open a terminal.
- Checkout the branch where the module is installed.
-
List all enabled modules:
php bin/magento module:status - Verify the extension is listed.
The extension name is in the format <VendorName>_<ComponentName>. It will not be in the same format as the Composer name.
Manage extensions
To manage your extensions, you can enable and disable or change settings per environment.
Enable and disable extensions
To enable or disable extensions, you must begin those changes on your local in a branch. You should never enable or disable extensions directly on your environments. These instructions assume you have config.php in your Git branch and implementation. If you do not use Configuration Management or config.php, we strongly recommend you do.
Trying to enable and disable extensions not following this method can lead to permissions and other issues.
- Work in a branch to update
config.php. - In a terminal, access your local development environment.
-
List all module.
php bin/magento module:status -
Enable a module.This command updates the
config.phpfile with the enabled status of the module.php bin/magento module:enable <module name> -
Disable a module. This command updates the
config.phpfile with the disable status of the module.php bin/magento module:disable <module name> -
Verify the status of a module:
php bin/magento module:status - Push your updates to the Git branch.
- Complete deployment to Integration for testing, then Staging for testing, and finally Production.
Modify configurations
You will update configurations according to Configuration Management for config.php.
Upgrade an extension
You should have a branch to work in when updating your extension. These instructions use composer to update the files. Before you continue, you must:
- Know the extension’s Composer name and version
- Know the extension is compatible with your project and Magento Commerce (Cloud) version. In particular, check the required PHP version.
To update an extension:
- If you haven’t done so already, change to your environment root directory.
- Open
composer.jsonin a text editor. - Locate your extension and update the version.
- Save your changes to
composer.jsonand exit the text editor. -
Update project dependencies:
composer update -
Enter the following commands in the order to commit the changes and deploy the project, including
composer.lock:git add -A git commit -m "<message>" git push origin <environment ID> - Wait for the project to deploy and verify in your environment.
If there are errors, see Component deployment failure.