Create and manage users
Magento Commerce (Cloud) enables you to administer users by assigning them one or more roles. A role provides access and improves security in your project. Different roles are authorized to do different things with your applications, environments, and users. You can add and manage user accounts for the entire project and permissions per available environment.
Updating your Pro project: These sections include instructions for Pro projects with Staging and Production available in the Project Web Interface. To add Staging and Production to your interface, see Add Staging and Production to Pro projects UI.
We can update Pro projects created before October 23, 2017. All new Pro projects include these features. Your ticket will be queued for update, which may take time to complete. We will keep you updated through the process.
If you do not request this update, you must use CLI commands or tickets to modify settings, variables, routes, and more for Pro plan Staging and Production environments.
Account owner role
The Account Owner is the only user with the Account Owner role. This user can perform any task in any project or environment, including delete it. The account is associated with the email address, name, and information for the person who registered the Magento Commerce (Cloud) account through the trial or create new account process.
The account has super user access and additional capabilities for managing all aspects of your project and environments.
Project-level roles
You can assign users to the following roles per project:
- Project administrator (also referred to as super user) can change settings and execute actions on any environment, including creating and restoring snapshots.
- Project reader can view all environments in a project but cannot execute any actions on them.
Environment-level roles
A project reader can have one of the following roles per environment:
- Environment administrator can change settings and execute actions on this environment, including merging with the parent environment.
- Environment contributor can push code to this environment and branch the environment.
- Environment reader can view this environment only.
We recommend you limit the environment administrator role to as few users as possible.
Role management best practices
When a development team works on a project, the team leader can be the project administrator and decide which roles to give his team members. One team member can contribute to one environment, another member can administer a different environment, and the customer can be a reader of the master environment.
For your users to be able to see everything but only commit to a specific branch, change their permission level on that environment to “Contributor”.
An environment contributor can push code to the environment, but that user role does not have SSH access to the environment. By default, only environment administrators have SSH access. You can change the behavior in .magento.app.yaml by specifying ssh: contributor.
Create and manage users
You can create and manage users using the Magento Cloud CLI or the Web Interface.
Manage users with the CLI
You can use the Magento Commerce (Cloud) command line client to fully manage your users and integrate this with any other automated system.
Available commands:
magento-cloud user:addadds a user to the projectmagento-cloud user:deletedeletes a usermagento-cloud user:list [users]lists project usersmagento-cloud user:roleviews or change a user’s role
For example, the following command adds the project administrator (admin) role to alice@example.com and gives her contributor privileges to the development environment:
The following prompts are displayed:
magento-cloud user:add

Email address: alice@example.com
The user's project role can be 'viewer' ('v') or 'admin' ('a').
Project role [V/a]: a
The user's environment-level roles can be 'viewer', 'contributor', or 'admin'.
development environment role [V/c/a]: c
Summary:
  Email address: alice@example.com
  Project role: contributor
Adding users can result in additional charges.
Are you sure you want to add this user? [Y/n]
User alice@example.com created
After this has been done, the user will receive an e-mail asking her to confirm her details and register an account name and a password.
To change Alice’s role on the environment development to admin, use the following command:
magento-cloud user:role alice@example.com --level environment --environment development --role admin
Use magento-cloud list to get the full list of commands.
Manage users with the Web Interface
To create user accounts using the Web Interface:
- Log in to your Magento Commerce (Cloud) account.
-
Click the Projects tab as the following figure shows.

- Click the name of your project.
-
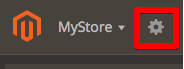
Click the configure project button next to project name in the top navigation bar as the following figure shows.
-
In the right pane, click Add Users.
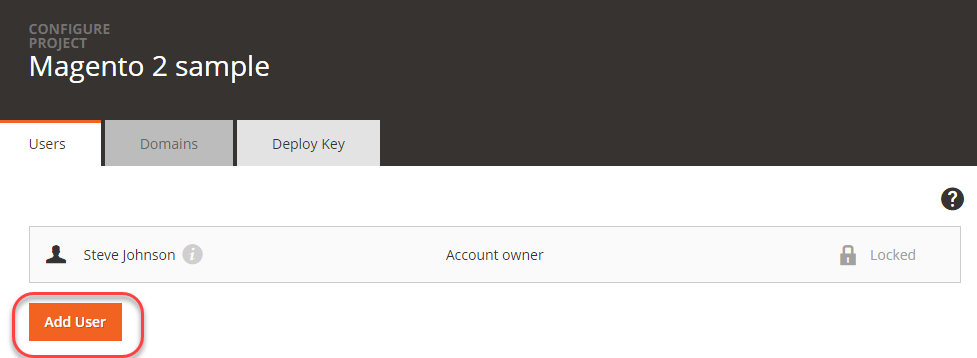
-
Click Add User.
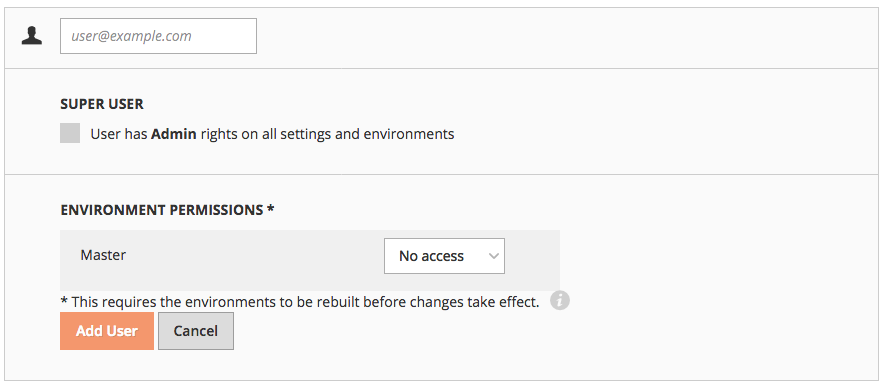
- Enter the user’s e-mail address.
-
Select the access for the account:
- For a project administrator account, select the Super User check box. This provides Admin rights for all settings and environments. If not selected, the account has only view options for all environments on a project.
- Select permissions per specific environment (or branch) in the Integration environment: No access, Admin (change settings, execute action, merge code), Contributor (push code), or Reader (view only). As you add active environments, you can modify permissions per user.
- Click Add User.
The users you add receive an e-mail inviting them to join the Magento Commerce (Cloud) project. The user must follow the prompts to register an account and verify their e-mail address. They receive access based on the set project and environment permissions.
Rebuild the environment
After a new user is added to an environment, the environment must be rebuilt. Rebuilds are triggered when you push a new commit to an environment. To be able to rebuild without new code changes, use the command git commit --allow-empty -m "redeploy" && git push <branch name> to create an empty commit and “force” rebuilding the environment.
When the environment rebuild is complete, allow a short time for the routes to update fully and for the new user to be able to use SSH access.