Blackfire.io for Magento Cloud
Blackfire.io for Magento Cloud is a PHP profiler and automated performance testing tool that can be used in the development Integration, Staging, and Production environments. It enables you to locate and investigate performance issues in your environment at the code level and creates a performance profile by tracking every PHP call, method, and SQL query performed by your code. Blackfire digs deeper to provide granular performance analytics.
In addition, it profiles your code automatically and notifies you whenever your code does not comply with best practices for Magento 2 code performance management. For a high level overview and demo of Blackfire, review the videos in the Introduction to Blackfire.io for Magento Cloud.
For full details on integrations, also review Configuring Blackfire on Magento Cloud.
Blackfire includes the following environments through their site:
Magento Cloud (<your instance reference>)—Integration and DevelopmentMagento Cloud (<your instance reference>)—StagingMagento Cloud (<your instance reference>)—Production
For Pro, you must enter a Support ticket with your Blackfire credentials to configure your Staging and Production environments with Blackfire.
Get your Blackfire credentials
The Project Owner is the account owner, and their e-mail address is part of the credentials required for accessing Blackfire for your project. You can only use the Project Owner credentials to integrate Blackfire with Magento Commerce (Cloud) and to log in to the Blackfire website. An invitation email is sent to the Project Owner’s e-mail address to complete activation.
For information on setting up an account on Blackfire, see Accessing your Blackfire account as a Magento Cloud user. You can access your Blackfire license key through project details.
Add collaborator accounts
After you access your Blackfire account, you can add additional collaborator accounts.
We recommend adding at least one account through Blackfire to manage all access, integrations, and usage of the tool. We also recommend promoting one of the added members to Admin, to manage all Blackfire access and integrations.
- Using your Project Owner Blackfire credentials, log in to Blackfire.
- Navigate to the Environments tab and select an environment.
- Click the Settings tab.
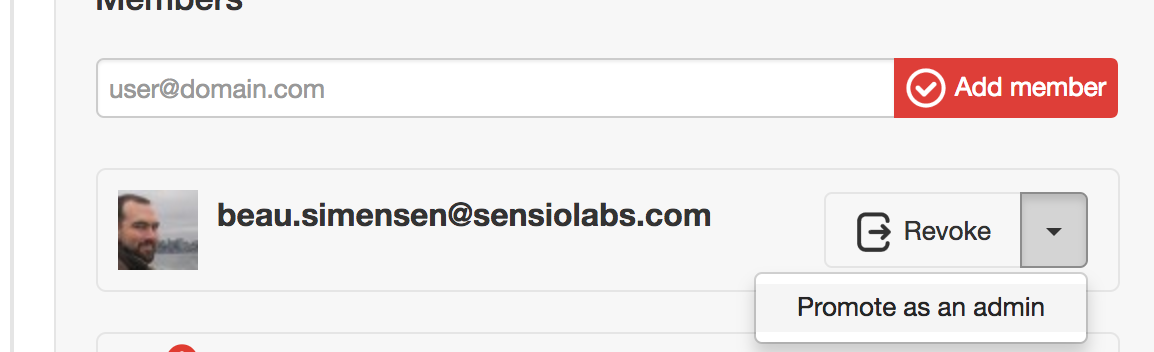
- Enter an e-mail address and click Add Member.
-
In the Revoke drop-down list of an account, click Promote as an admin.
Enable Blackfire on local workspace
You need to install and configure Blackfire on your local workspace with your working Magento Commerce (Cloud) installation. You do not need to run these installations directly on the hosted environments; only on your local.
We recommend using the Blackfire installation guide to walk you through the process:
- Log in to Blackfire.
- Navigate to the Environments tab and select the Integration environment.
- Click the Settings tab.
- Scroll to the bottom and locate the Server ID and Server Token for the environment. You need these values for the instructions.
- Open the Blackfire installation guide, select the Operating System, and follow the instructions.
Integrate Blackfire
We recommend enabling Blackfire in all of your active environments, including the Integration environment. See Configure the server credentials & the integration with Magento Cloud. You can integrate with the Pro Integration environment and Starter development branches.
For Starter plans, pushing your code and .magento.app.yaml file to the Staging and Master branches updates those environments directly. You can directly add Blackfire to those environments the way you do with development.
These instructions assume you have set up your local workspace.
- Log in to Blackfire.
- Navigate to the Environments tab and select the Integration environment.
- Click the Builds tab.
-
Click the info icon next to Magento Cloud.
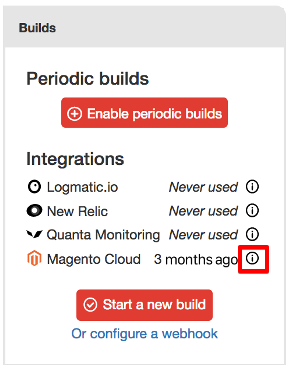
-
In the Magento Cloud Integration page, follow the additional steps to complete the integration. The redacted content is the Project ID.
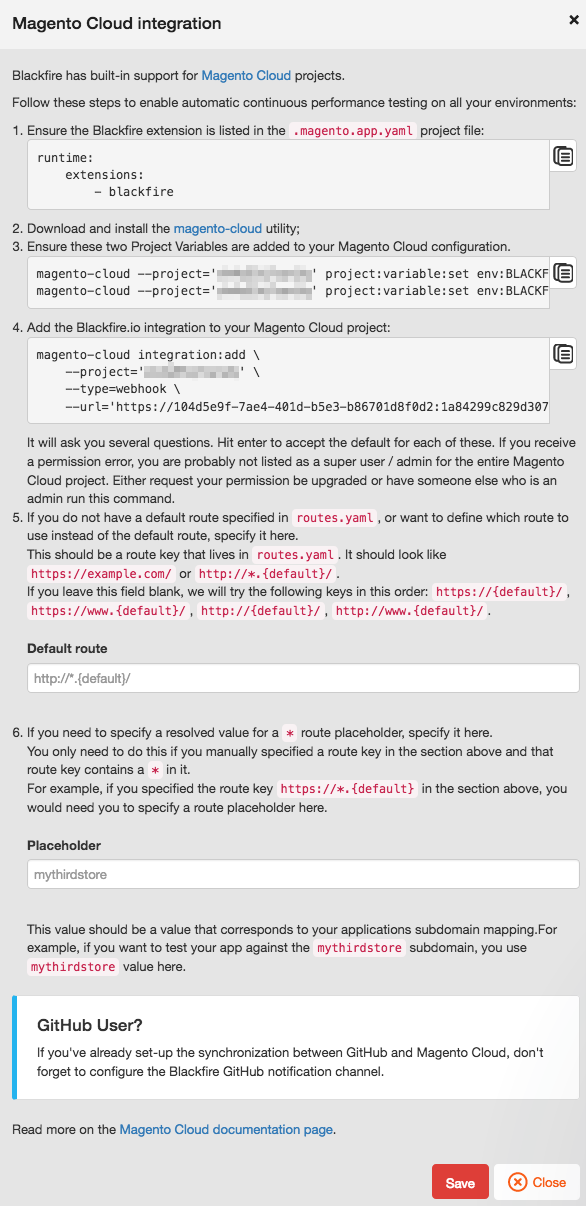
The following sections include instructions for completing this list of integration tasks.
- Add Blackfire to .magento.app.yaml
- Add project variables
- Add Blackfire integration to the project
- Add a default route
- Save changes in Blackfire
Add Blackfire to .magento.app.yaml
By default, the .magento.app.yaml file includes the Blackfire module. If the module is not present, use the following instructions to update your .magento.app.yaml file, push the updated file to your remote branch, merge, and deploy across all environments.
- For Starter, merging your Git branch across all environments adds the module.
- For Pro (legacy), you need to enter a Support ticket to have
.magento.app.yamlupdated to Staging and Production.
We recommend working in a branch and creating a snapshot prior to installing. If you have a branch already created, you can skip down to the steps for modifying the .magento.app.yaml file. If you need instructions creating a branch, complete the following:
-
Log in to your Magento Commerce (Cloud) project.
magento-cloud login -
List projects.
magento-cloud project:list -
List environments in the project.
magento-cloud environment:list -p <project_ID> -
Verify current branch.
git branch -
If necessary, check out an existing branch.
magento-cloud environment:checkout <environment_ID>You can also create a new branch using the
magento-cloud environment:branchcommand. -
Back up the environment using a snapshot.
magento-cloud snapshot:create -e <environment_ID>
Next, modify the .magento.app.yaml file:
- Use a text editor to locate and edit
<project root dir>/.magento.app.yamlin your branch. -
Enter
- name: blackfirein theextensionsblock underruntime.# .magento.app.yaml runtime: extensions: - mcrypt - redis - xsl - json - blackfire - Save your changes to
.magento.app.yamland exit the text editor. -
Add, commit, and push your changes to the environment.
git add -A
git commit -m "<message>"
git push origin
If errors display during deployment, open the
.magento.app.yamlfile and check the syntax, such as indentation and spelling, and try again.
Add project variables
Add project variables for Blackfire for the server ID and token. You can add these using the Magento Cloud CLI or the Project Web Interface. The following instructions walk through adding them using CLI commands.
- Open a terminal and navigate to your Magento Commerce (Cloud) project.
- Copy the commands from step 3 on the Blackfire Magento Cloud Integration page.
-
Paste and enter the commands in the Magento Cloud CLI. Since you are already in your project, remove the
--project='<Project ID>'content from the command. The commands include the Project ID and Blackfire server ID and token, similar to the following:magento-cloud project:variable:set env:BLACKFIRE_SERVER_ID <Blackfire Server ID>magento-cloud project:variable:set env:BLACKFIRE_SERVER_TOKEN <Blackfire Server Token>
Add Blackfire integration to the project
Using the Magento Cloud CLI, you will enter an integration command to connect Blackfire with the project. This command requires using an account with super user access. Make sure your Cloud Project account has the super user option in the Project through the Project Web Interface.
- Open a terminal and navigate to your Magento Commerce (Cloud) project.
-
Copy and enter the integration commands from the Blackfire Magento Cloud Integration page.
magento-cloud integration:add \ --project='<Project ID>' \ --type=webhook \ --url='<Blackfire provided URL>' - A series of requests display for the command. To accept default values, hit enter for the questions. If you receive a permission error, make sure you have super user access for the Magento Commerce (Cloud) project. Either request your permission be upgraded or have someone else who is an admin run this command.
Add a default route
If you do not have a default route specified in the routes.yaml file, or want to define which route to use instead of the default route, add it to Blackfire and routes.yaml.
To add route information on the Blackfire Magento Cloud Integration page:
- Locate step 5 and enter the default route. It should look like
https://example.com/orhttp://*.{default}/. If you leave this field blank, we will try the following keys in this order:https://{default}/,https://www.{default}/,http://{default}/,http://www.{default}/. - If you use a wildcard
*in step 5 for the default route, you need to enter a resolved value for the*value in step 6. Otherwise, leave step 6 empty. For example, if you specified the route keyhttps://*.{default}in step 5, you need to specify a route placeholder in step 6.
To add the default route to routes.yaml:
-
Log in to your Magento Commerce (Cloud) project.
magento-cloud login -
List projects.
magento-cloud project:list -
List environments in the project.
magento-cloud environment:list -p <project_ID> -
Verify current branch.
git branch -
If necessary, check out an existing branch.
magento-cloud environment:checkout <environment_ID> -
Back up the environment using a snapshot.
magento-cloud snapshot:create -e <environment_ID> - Use a text editor to locate and edit
<project root dir>/magento/routes.yamlin your branch. -
Add the route the file. See Configure routes.
"http://{default}/": type: upstream upstream: "blackfire:php" - Save your changes to
routes.yamland exit the text editor. It should look likehttps://example.com/orhttp://*.{default}/. If you leave this field blank, we try the following keys in this order:https://{default}/,https://www.{default}/,http://{default}/,http://www.{default}/. -
Add, commit, and push your changes to the environment.
git add -A
git commit -m "<message>"
git push origin
If errors display during deployment, open
routes.yamland check the syntax. Check indentation and spelling and try again.
Save changes in Blackfire
With all integrations entered on the Blackfire Magento Cloud integration page, click Save. All integration settings save to your Blackfire account with saved integrations and connections with changes entered to your Magento Commerce (Cloud) project. Continue to the next section to begin profiling your store to verify the integration.
Profile your store
You can verify that Blackfire works using a browser extension or the CLI. For extensive CLI profiling options and better understanding the profiles, see Blackfire resources.
You can only use the CLI in your local development environment.
To profile using the browser:
- Install the Blackfire browser extension in Chrome or Firefox. A Blackfire icon displays in your browser next to the address location. If you do not see it, you may need to display the bar.
- Visit the store or site URL for your specific environment, such as the URL for your Integration environment. If you need this URL, you can find it through the Project Web Interface. Select the environment branch and copy the link from the Access section.
-
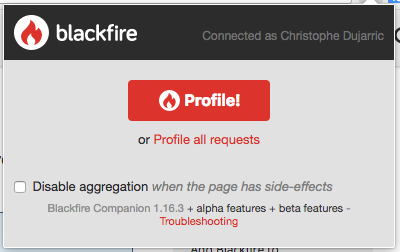
Click the Blackfire icon.
-
Click Profile to start.
Note: The browser extension also enables you to profile all requests while you browse. For more information about this, see Blackfire resources.
To profile using the CLI:
- Open a terminal and navigate to your Magento Commerce (Cloud) project.
- Checkout an active Integration branch.
-
Run the profiler.
php --ri blackfireA sample result follows:
blackfire

Blackfire => enabled
Blackfire => 1.10.3
Timing measurement => cgt
Num of CPU => 8
Profiling heap memory => 0 Kb
Main instance trigger mode => HTTP header triggered
Main instance => enabled

Main instance info
Output stream => file
Signature validated => no
EnvId validated => no
Fully decoded => no

Directive => Local Value => Master Value
blackfire.agent_socket => tcp://blackfire.platform.sh:8307 => tcp://blackfire.platform.sh:8307
blackfire.agent_timeout => 10 => 10
blackfire.env_id => no value => no value
blackfire.env_token => no value => no value
blackfire.log_level => 1 => 1
blackfire.log_file => no value => no value
Automate performance testing
After completing the Blackfire Integration, you can define events for the Staging and Production environments that enable Blackfire to execute polling requests automatically. An event example is whenever a commit deploys in the Integration environment, or when activating the integration between Blackfire and New Relic.
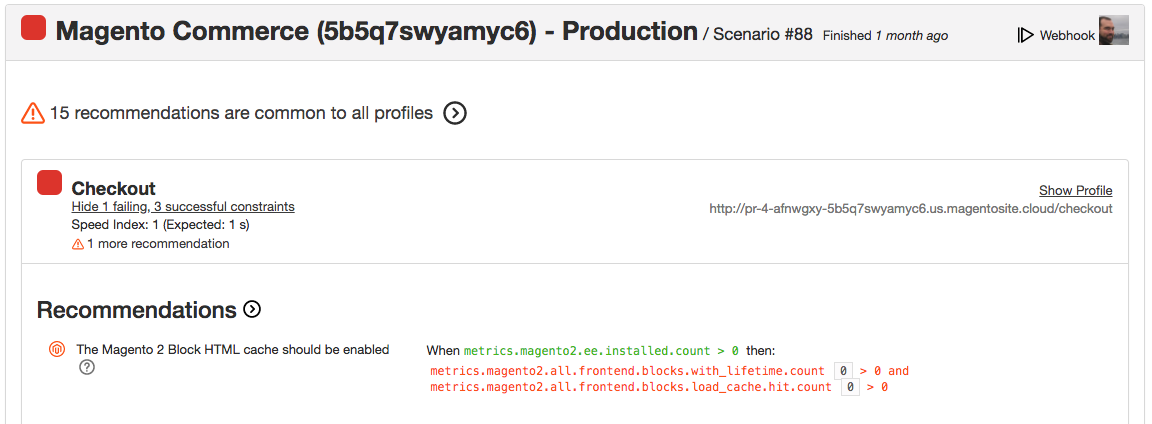
By simply defining a set of key requests for Blackfire to profile— /home, /checkout, /checkout/payment—Blackfire can notify you if your code complies with established code performance recommendations. The following is a sample build report with recommendations:
Writing your first automated tests and scenarios
You can easily write tests and scenarios for Blackfire to execute. Create a .blackfire.yml file and store it at your project root directory.
Try adding the following scenarios in the file:
    # .blackfire.yml
    scenarios:
        Home:
            - /index.php

        Product list:
            - /index.php/women/tops-women/jackets-women.html

        Checkout:
            - /index.php/checkout

        Payment:
            - /index.php/checkout/payment
See the Blackfire documentation on how to write tests and scenarios.
Running your tests automatically
Once you create and deploy your .blackfire.yml file, you can enable Blackfire to run your tests automatically in various ways:
- Automated builds on Integration—Whenever you push code on an Integration branch, Blackfire automatically runs your tests. You can receive a notification of the results in various ways, such as a commit status level when using GitHub or Bitbucket. See Blackfire notifications.
- Automated builds using a webhook—Blackfire offers a very flexible way to start builds using a webhook, which can target any endpoint. See Start building a webhook.
- Automated builds with the Blackfire/New Relic integration—Blackfire and New Relic are very complementary. New Relic monitors the overall traffic performance, and Blackfire profiles much deeper into the PHP code. See What is the difference between Blackfire and New Relic. You can configure New Relic to fire Blackfire builds whenever relevant. See New Relic.
Blackfire notifications
When you configure at least one way of triggering builds with Blackfire, you can be notified whenever a build report is available. Blackfire supports an integration with Slack, GitHub, BitBucket, email, and more. See Scenario notification channels.
Blackfire resources
Blackfire provides great information to better profile and investigate the results on their documentation site: